


6
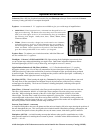
the side and bottom of the Star Pointer. The alignment procedure is best done at night since the LED dot will be
difficult to see during the day
.
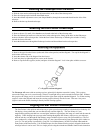
1. To turn on the Star Pointer, rotate the variable brightness control clockwise until you here a "click". To increase
the brightness level of the red dot, continue rotating the control knob about 180º until it stops.
2. Locate a bright star or planet and center it in a low power eyepiece in the main telescope.
3. With both eyes open, look through the glass window at the alignment star.
If the Star Pointer is perfectly aligned, you will see the red LED dot overlap the alignment star. If the Star Pointer is
not aligned, take notice of where the red dot is relative to the bright star.
Without moving the main telescope, turn the Star Pointer's azimuth and altitude alignment controls until the red dot
is directly over the alignment star.
If the LED dot is brighter than the alignment star, it may make it difficult to see the star. Turn the variable brightness
control counterclockwise, until the red dot is the same brightness as the alignment star. This will make it easier to
get an accurate alignment. The Star Pointer is now ready to be used . Remember to always turn the power off
after you have found an object. This will extend the life of both the battery and the LED.
F
F
i
i
n
n
d
d
i
i
n
n
g
g
O
O
b
b
j
j
e
e
c
c
t
t
s
s
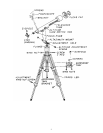
1. Loosen the altitude locks on the sides of the telescope tube and the silver azimuth lock on the base of altazimuth
mount, then move the telescope in the desired direction.
2. Look through the Star Pointer finderscope and pan the telescope until the object appears in the field of view.
Once it’s in the field, tighten the altitude and azimuth locks.
3. To center the object with the red dot in the Star Pointer, use the fine adjustment ring on the altitude slow motion
rod assembly.
F
F
o
o
c
c
u
u
s
s
i
i
n
n
g
g
1. Once you have found an object in the telescope, turn the focusing knob until the image is sharp.
2. To focus on an object that is nearer than your current target, turn the focusing knob toward the eyepiece (i.e., so
that the focusing tube moves away from the front of the telescope). For more distant objects, turn the focusing knob
in the opposite direction.
3. To achieve a truly sharp focus, never look through glass windows or across objects that produce heat waves, such
as asphalt parking lots.
I
I
m
m
a
a
g
g
e
e
O
O
r
r
i
i
e
e
n
n
t
t
a
a
t
t
i
i
o
o
n
n
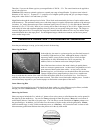
1. When observing with a diagonal, the image will be right side up, but reversed from left to right.
2. When observing straight through, with the eyepiece inserted directly into the telescope, the image will be inverted.
Also, the image in the finderscope is inverted.
M
M
A
A
G
G
N
N
I
I
F
F
I
I
C
C
A
A
T
T
I
I
O
O
N
N
The magnification (or power) of a telescope varies depending upon the focal length of the eyepiece being used and
the focal length of the telescope.
The Firstscope telescope has a focal length of 700mm and comes with a 20mm 1¼" eyepiece. To calculate
magnification, use the following formula, in which FL = focal length:
Magnification =
FL (telescope) in mm
FL (eyepiece) in mm