


4
T
T
H
H
E
E
F
F
I
I
R
R
S
S
T
T
S
S
C
C
O
O
P
P
E
E
6
6
0
0
R
R
E
E
F
F
R
R
A
A
C
C
T
T
O
O
R
R
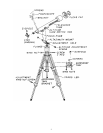
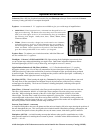
The Firstscope AZ is a classical, two element refracting telescope that comes on an altazimuth mount. This section
instructs you on the proper assembly and use of your Firstscope telescope, which is shipped in one box, containing
all the parts you need to assemble it. Unpack and lay out all of the parts in a large, clear area where you’ll have
room to work. Keeping track of the parts, use the list below and the telescope diagram to confirm you have, and can
identify each part.
• Three tripod legs, with one accessory tray bracket mounted on each leg. (Firstscope 70 AZ comes with a
collapsible center leg brace).
• Tripod accessory tray
• Altazimuth mount
• Telescope Optical Tube
• Lens shade; front and rear lens caps (pre-assembled)
• Rack and pinion focuser (pre-assembled)
• Altitude slow motion rod assembly (Firstscope 60 model)
• Star Pointer Finderscope with bracket.
• One 1¼" 90° diagonal
• 20mm 1¼" eyepieces
• 10mm 1¼ " eyepiece
• 1.5x Erecting eyepiece
S
S
e
e
t
t
t
t
i
i
n
n
g
g
U
U
p
p
T
T
h
h
e
e
T
T
r
r
i
i
p
p
o
o
d
d
To set up the tripod, locate the altazimuth mount, the tripod legs and the tripod bolt pack.
1. Extend the center portion of each of the three tripod legs down 6-8".
2. Open the tripod adjustment bolt pack. Use the three wing nut screws to secure each of the extended legs by
threading these screws through the holes in the brackets at the bottom of each leg. This is important. If you do not
extend the legs now, you won’t be able to once the tripod head is assembled. Fine tuning of tripod height can be
done later, and the wing nuts can be adjusted to secure the telescope at a desirable height.
3. Orient the three tripod legs so the brackets that hold the accessory tray are on the inside.
4. Slide the two top portions of the tripod leg around the flange on the altazimuth mount, so the flange is secured
between them.
5. Remove the wing nut and one washer from the screw.
6. Slide the screw through the tripod leg and flange, until the screw extends out the other side.
7. Slide the washer and wing nut over the screw and tighten. This can be left slightly loose, to allow for positioning
the legs later, when attaching the accessory tray.
8. Repeat this process for the remaining two legs. Now the tripod will stand by itself.
A
A
t
t
t
t
a
a
c
c
h
h
i
i
n
n
g
g
t
t
h
h
e
e
A
A
c
c
c
c
e
e
s
s
s
s
o
o
r
r
y
y
T
T
r
r
a
a
y
y
Start by locating the accessory tray and bolt pack for the accessory tray.
1. Remove the wing nut and one washer from each screw.
2. Slide one corner of the accessory tray over the bracket hanging from the tripod leg. Note: remove plastic tips from
each bracket. Plastic tips serve only to protect the tripod leg from being scratched. Make sure the tray is placed over
the tip of the bracket, so the bracket doesn’t cover the holes cut into the accessory tray, allowing for full use. For the
Firstscope 70 AZ, the accessory tray sits on top of the center leg brace and attaches with the provided winged bolts.
3. Insert a screw—with washer—down through the accessory tray and bracket.
4. Slide the washer and wing nut over the end of the screw. Tighten the screw completely.
5. Repeat this process for the remaining two corners of the accessory tray.