


5
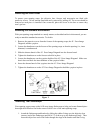
Removing the Lens Cover
To protect your spotting scope, the objective lens, focuser, and accessories are fitted with
protective covers. All are tension-fitted and easily removed by pulling off. The covers should be
removed as each piece is installed. Once removed, place the covers in the box to ensure they
won’t get lost.
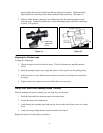
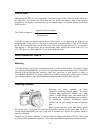
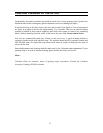
Attaching the Standard Accessories
With your spotting scope attached to a sturdy mount, as described earlier in this manual, you are
ready to attach the standard accessories. To do this:
1. Remove the protective cover from the focuser of the spotting scope, the 45º Erect Image
Diagonal, and the eyepiece.
2. Loosen the thumbscrew on the focuser of the spotting scope so that the opening (i.e., inner
diameter) is unobstructed.
3. Slide the chrome barrel of the 45º Erect Image Diagonal into the focuser barrel.
4. Tighten the thumbscrew on the focuser to hold it in place.
5. Loosen the thumbscrew on the eyepiece holder of the 45º Erect Image Diagonal. Make sure
that it does not block the inner diameter of the eyepiece holder.
6. Insert the chrome barrel of the eyepiece into the 45º Erect Image Diagonal.
7. Tighten the thumbscrew on the 45° Erect Image Diagonal to hold the eyepiece in place.
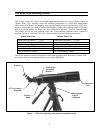
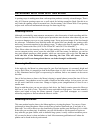
Figure 2
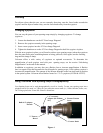
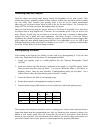
Attaching The Finderscope
Your spotting scope comes with a 8x20 erect image finderscope to help you locate distant objects
that might be difficult to find in the narrow field of view of the main spotting scope.
1. Attach the finderscope and bracket by sliding the rubber O-ring over the objective lens
(narrow) end of the finderscope and roll it 1/3 of the way up the finderscope body. Then
insert the object lens end of the finder through the rings in the bracket until the O-ring