


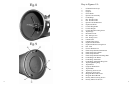

AssemblyofyourRedPlanetTelescope:
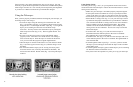
Setting Up Your Tripod:
Thealuminumtripodcomespreassembledandready-to-use.Removethe
tripod from the box and pull apart the legs. Gently push down the tripod
braces(Fig.7-35)untiltheyareinthelowestposition.Turnthetightening
ring(Fig.7-31)(locatedatthecenteroftheTripodBrace)clockwisetolock
the tripod in the open position. You can then extend the legs to the desired
heightbypullingopenthetaboneachleglock(Fig.7-36),slidingtheleg
down the desired amount and then pushing the leg lock back against the leg
intothelockedposition(Fig.7-35).Repeattheprocesswitheachlegtrying
to keep the tripod as level as possible with the ground. You will notice there
areholesinthetripodlegbraces(Fig.7-33).Thesearedesignedtoholdeye-
pieces when not in use. For added stability you can hang a weight from the
tripodhook(Fig.7-34)locatedatthebottommiddleportionofthetripod.
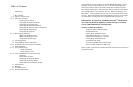
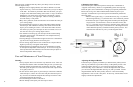
Attaching the Equatorial Mount:
Removetheequatorialmount(Fig.2-10)fromtheboxandtwistintothe
positionshowninFig.3.Placethebottomofthemount(Fig.3-20)intothe
hole in the top of the tripod head and secure with the mount locking screw
(Fig.3-21).Pleasebecarefultomakesurethatthemountissecurelyat-
tached to the tripod.
Attaching the Counterweight:
Attachthethreadedendofthecounterweightbar(Fig.2-11)intothethreaded
holeintheequatorialmount(Fig.2-10).Removethesafetyscrewfromthe
endofthecounterweightbarandsetasideforamoment.Slidethecounter-
weight(Fig.2-12)ontothebarandtightendownusingthescrewontheside
ofthecounterweight(Fig.2-13).Becarefulnottodropthecounterweight.
Itisquiteheavyandcouldharmyouordamageyouroorifdropped.Do
notworryaboutthepositionofthecounterweightjustyet.Wewillpositionit
properlylater.Replacethesafetyscrewattheendofthecounterweightbar.
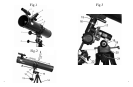
Attaching the Slow Motion Cables:
Locatethetwoslowmotioncables(Fig.1-7,8).Loosenthescrewattheend
ofeachcablesothatitdoesnotprotrudethroughthehole.Slidetheshort
cableontoeithersideoftheR.A.shaft(Fig.1-8)(locatedatthebottomof
themount)andtightendownwiththelockingscrew.Youcanplacethecable
on either side depending on which side is most comfortable for you to use.
SlidethelongercableontotheDec.shaft(Fig.1-7)(locatedatthetopofthe
mount)andtightendownwiththelockingscrew.Theseslowmotioncables
willallowyoutomakenepointingadjustmentstothetelescopeinboth
R.A.anddeclination.Thiswillbediscussedinmoredetaillater.
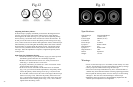
Attaching the Telescope Tube to the Mount:
Removethetwocradlerings(Fig.1-6)fromthebox.Therearetwoholes
inthetopoftheequatorialmount(calledtheopticaltubesaddleplate(Fig.
2-9)).Placethethreadedscrewatthebottomofeachcradlering(Fig.6-29)
through one of these holes and secure it using the included washer and wing
nut(Fig.6-30).Attachandsecuretheothercradleringinthesameway.
Makesurethatthecradleringlockknobs(Fig.6-28)arebothonthesameside.
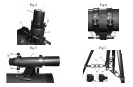
Unscrewthelocks(Fig.6-28)oneachcradleringandopenthemboth.Care-
fullyremovetheopticaltubeassembly(Fig.1-5)fromthebox.Gentlyrest
theopticaltubeintothecradleringswiththefocuser(Fig.1-2)towardsthe
front. The cradle rings should be roughly in the center of the tube. We will
balance this later. Close the cradle rings around the telescope and secure by
tighteningthecradleringlockknobs(Fig.6-28).
Attaching the Finder Scope:
Therearetwonderscopebracketmountingbolts(Fig.5-27)locatedatthe
frontendoftheopticaltube.Removethenutsandsetaside.Placethender
scopebracket(Fig.5-26)ontothemountingboltsandtightendownsecurely
totheopticaltube.MakesurethebracketisfacingforwardasshowninFig.
5.Slidethenderscope(Fig.1-1)intothebracketfacingforward.Tighten
downthenderscopebracketthumbscrews(Fig.5-24)tosecurethender
scope in place.
Attaching the Eyepieces:
InserttheKellner20mmeyepiece(Fig.1-3)intothefocuser(Fig.1-2)and
tightendownusingthefocuserlockingscrew(Fig.4-23).
YouhavenowcompletedtheassemblyofyourRedPlanet
TM
telescope.
Wewillnowneedtomakethenecessaryadjustmentsinordertouseyour
telescope properly.
1110