


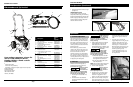

Lavadoras a Presión
25 Sp
Mantenimiento
Para asegurar una vida y un
rendimiento máximos de la lavadora a
presión, cumpla con intervalos de
mantenimiento regulares. Remítase al
plan de mantenimiento recomendado.
Si usted hace funcionar la lavadora a
presión en ambientes con mucho
polvo, realice revisiones de
mantenimiento con más frecuencia.
INSTRUCCIONES PARA EL CAMBIO
DE ACEITE DEL MOTOR
Antes de voltear el
motor o el equipo
para drenar el aceite, drene el
combustible del tanque de combustible.
NOTA: Cambie el aceite mientras el
motor está frío.
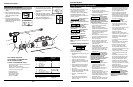
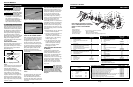
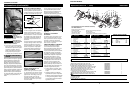
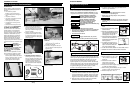
1. Desconecte el cable de la bujía.
2. Localice y retire el tapón de drenaje
de aceite del motor (vea la figura
13).
3. Drene el aceite usado.
4. Vuelva a colocar el tapón de
drenaje y enderece la unidad.
5. Vuelva a llenar la unidad con aceite
nuevo del tipo y la cantidad
recomendada. Llene la unidad al
nivel apropiado indicado en la varilla
de medición.
INSTRUCCIONES PARA EL CAMBIO
DE ACEITE DE LA BOMBA
Para cambiar o llenar el aceite de la
bomba es necesario quitar la bomba
del motor, y esto no debería ser
necesario a menos que exista una
pérdida de aceite debido a juntas
dañadas o desgastadas en la bomba.
Si goteó aceite de la bomba, lleve la
lavadora a presión a un centro de
servicio certificado de Maxus para que
sea reparada.
Funcionamiento (Continuación)
6. Vierta aproximadamente 177 mL
(6 oz.) de anticongelante RV dentro
del embudo.
7. Tire del cordón de encendido varias
veces hasta que el anticongelante
RV salga por la salida de la bomba.
8. Desconecte la manguera de alta
presión de la pistola y drene la
manguera. Sostenga la pistola y la
lanza en posición vertical y presione
el gatillo para drenar el agua.
CONSEJOS PARA PROLONGAR LA VI-
DA DE SU LAVADORA A PRESIÓN
1. Nunca haga funcionar la unidad sin
agua.
2. Su lavadora a presión no está diseña-
da para bombear agua caliente.
Nunca conecte su lavadora a presión
a un suministro de agua caliente ya
que esto reducirá en forma significati-
va la vida de la bomba.
3. Hacer funcionar la unidad durante
más de un minuto sin rociar agua
provoca que se acumule calor en la
bomba. Hacer funcionar la unidad sin
rociar agua puede dañar los compo-
nentes de la bomba.
4. Suelte el gatillo antes de cambiar la
lanza de alta a baja presión. Si no lo
hace es posible que reduzca la vida
útil de los anillos O en la lanza.
Figura 16 – Ubicaciones de los drenajes de aceite
www.chpower.com
Pressure Washers
8
Operation (Continued)
To reduce the risk of bodily injury or
property damage, always follow this
procedure whenever spraying is stopped,
when work is completed, and before
checking or repairing any part of the
system.
1. Engage the trigger safety latch.
2. Turn the unit off.
3. Remove the ignition cable from the
spark plug.
4. Shut off the water supply.
5. Disengage the trigger safety latch and
trigger the gun to relieve pressure.
6. Re-engage the trigger safety latch.
7. Before overnight storage, long term
storage, or transporting unit,
disconnect the water supply and turn
off the fuel supply valve.
1. Be sure all detergent is flushed from
system.
2. Turn the engine OFF.
3 Turn the water supply OFF.
4. After the engine and water supply are
turned off, trigger the gun to
depressurize the system.
NEVER turn the
water supply off
before turning the engine/motor off.
Serious damage could occur to the pump
and/or engine/motor.
NEVER disconnect
the high pressure
discharge hose from the machine while
the system is pressurized. To depressurize,
turn engine/motor off, turn water supply
off and squeeze gun trigger 2-3 times.
5. After each use, wipe all surfaces of the
pressure washer with a clean, damp
cloth.
• Do not store the pressure washer
outdoors.
• Do not store the pressure washer
where it might freeze unless it has
been properly winterized.
LONG TERM STORAGE INSTRUCTIONS
(MORE THAN 30 DAYS IN STORAGE)
1. Remove fuel from the tank and run the
pressure washer in a normal operating
mode until the engine stops from a
lack of fuel. Normal operating mode
means actually spraying water from the
gun while the engine is running.
Alternate method – Add fuel
stabilizer to gas in the tank and run in
normal operating mode for at least
five minutes.
2. Stop the engine, turn off the water
supply, and trigger the gun to release
pressure in the high-pressure hose.
3. Disconnect the water supply and high
pressure hose from the pump.
4. Allow the engine to cool.
5. Disconnect the spark plug wire and
remove the spark plug.
6. Pour 1/2 oz. of engine oil into the
spark plug hole.
Never pull the
starter rope on the
engine when the spark plug is removed
unless the spark plug hole is covered. Fuel
vapor from the hole can ignite by a spark.
7. Place a rag over the spark plug hole
and slowly pull the starter rope several
times to distribute the oil.
WINTERIZING INSTRUCTIONS
1. Follow and complete the Long Term
Storage Instructions above.
2. Disconnect the spark plug wire.
3. Disconnect the high pressure hose
from the pump.
4. Insert a 12” to 14” piece of garden
hose into the pump inlet.
5. Place a funnel in the other end of the
garden hose.
Read the
manufacturer’s
instructions for safe handling and
disposal of RV antifreeze.
6. Pour approximately 6 oz. of RV
antifreeze into the funnel.
7. Pull the starter rope several times until
the RV antifreeze comes out of the
pump outlet.
8. Disconnect the high pressure hose
from the gun and drain the hose. Hold
the gun and lance in a vertical position
and squeeze the trigger to drain the
water out.
TIPS FOR EXTENDING THE LIFE OF
YOUR PRESSURE WASHER
1. Never operate the unit without water.
2. Your pressure washer is not meant to
pump hot water. Never connect your
pressure washer to a hot water supply
as it will significantly reduce the life of
the pump.
3. Running the unit for more than one
minute without spraying water causes
heat to build up in the pump.
Running the unit without spraying
water can damage pump components.
4. Release the trigger prior to switching
the lance between high and low
pressure. Failure to do so may reduce
the life of the o-rings in the lance.
9. Storage
7. Pressure Relief Procedure
8. Shutdown