


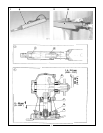
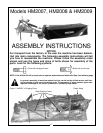

Cutterbar
NOTICE
Be particularly attentive when checking or repairing the cutterbar - it rotates at 3000 rpm. Take
care that worn bearings and gear wheels must be replaced in time. Otherwise a single damaged
bearing might cause damage to the whole cutterbar. Use LOCTITE when stated - hardening time
approx. 15 minutes.
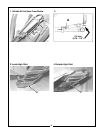
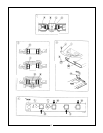
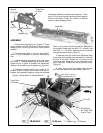
Intermediate gear (illustration 1)
Inspection of intermediate gear can be carried out through the collar bearings holes.
Intermediate gears can only be removed through the opening in the right hand side of the cutter-
bar, but gear at (L) and gear at (T) (only model HM2007 and model HM2009) can be removed
through collar bearing hole. These gears are smaller than the others. Note the following when
replacing the bearings:
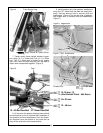
● When pressing out the bearing, sealing ring (A) is pressed into pieces. Use a new sealing ring
when fitting a new bearing.
● Check that gasket (B) and (D) have not been damaged. The thread surfaces on bolt (C) must
be locked with LOCKTITE type 242. The torque setting is Nm = 90 (66.4 ft./lbs.).
Collar bearings (illustration 2)
Press the bearing into the bearing housing. Mount the locking (E). Fill the hollow space (F) of the
flange, shown at (F), with grease of good quality. NOTE: A tool kit is available for this procedure.
Use a support on the inner race of the bearing when the flange axle is pressed into the bearing.
Place the key (G) in the gear wheel hub, carefully press the parts together, and be sure that the
key slides correctly into the keyway of the shaft.
Apply a little LOCTITE 242 to the retaining bolt (H) and tighten with a torque wrench to Nm =50 (37
Ft. Lbs.).
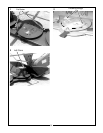
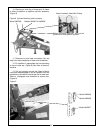
Fixing of collar bearing (ilustration 3)
Lock the bolts (J) by means of tabs (I). Torque moment is 90± 3 Nm (66 ± 2 Ft. Lbs ). Check that
the gaskets (K) in the loose threaded pins are not damaged. Use the threaded rod (R) for the collar
bearing in the righthand side.
Synchronizing (illustration 4)
Before fitting the collar bearing take care that the collar bearing flanges are in the correct positions
in relation to each other. This is especially important between the 1st and 2nd disc on the model
HM2007 and model HM2009, as the discs rotate the same way. This synchronizing can be
achieved in the following way:
● Fit the 1st collar bearing - turn the flange so that the marked edge (M) faces to the rear.
● Fit the 2nd collar bearing. Turn the flange so that the marked edge (N) faces forward in the
drive direction before lowering the gear wheel into mesh. Continue with this procedure when
fitting the other collar bearings (P), (Q), etc.
① - ➃
43