


MAINTENANCE
1947/2047 01/11 Maintenance Section 5-9
© 2011 Alamo Group Inc.
MAINTENANCE
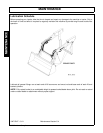
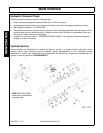
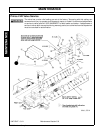
Valve Disassembly
Note: It is advisable to mark or tag all parts so they will be reinstalled in their proper position.
1. Slide boot (6) to top of handle (34). Remove hex head cap screws (36) from rod ends (9 & 10). Remove
handle with boot and adapter plate (8). Remove nuts (28) from spool stud (7) and rod end assemblies (10)
from valve.
Note: Spool adapters (33) are factory assembled. Removal from spools is not necessary. If replacing a
damaged adapter, clean threads with loctite primer and install using loctite 262.
2. Remove hex head cap screws (13) and detent end caps (14) from both spools. Remove detent sleeve (12)
from regen spool. Remove steel balls (20), poppet (21) and poppet spring (19) from detent retainer (24).
Remove retaining flat (15) and detent spacer (16) from regen spool.
3. Secure handle end of regen spool. Using a rod through retainer ball holes, remove detent retainer (24)
from regen spool.
Note: Detent retainers (18 & 24) are installed on spools using Locktite 222 or equivalent. If spool adapter
comes loose instead of detent retainer, pull spool completely out of valve and secure spool using vice grips
on land section of spool not machined for valve bore.
4. Remove washer (17), centering spring (26) and stop cup (23) from regen spool.
5. Holding in on float detent sleeve (22), push in on float spool from handle end and remove steel balls (20)
from float detent retainer (18). Remove float detent sleeve (22), poppet (21), poppet spring (19), retaining
flat (15) and spacer (16) from float spool.
6. Secure handle end of float spool. Using a rod through retainer ball holes, remove detent retainer (18) from
float spool.
Note: Detent retainers (18 & 24) are installed on spools using Locktite 222 or equivalent. If spool adapter
comes loose instead of detent retainer, pull spool completely out of valve and secure spool using vice grips
on land section of spool not machined for valve bore.
7. Remove washer (17), centering spring (26) and stop cup (23) from float spool.
8. Push spools in from handle end until rear spool seals (1) are exposed. Using wire hook and screwdriver,
remove rear spool seals. Push spools in from the rear until front spool seals (1) are exposed. Using wire
hook and screwdriver, remove front spool seals.
9. Clean all parts, including valve body, in suitable cleaning solvent. After cleaning parts with solvent, use air
pressure to blow any dirt or excess solvent from all parts including inside of valve body.