


65 Series Rotary Tiller
13
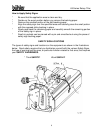
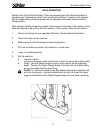
ATTACHING/UNHOOKING
The Tiller should always be located on a level, dry area that is free of debris and other
foreign objects. When attaching the machine to a tractor, follow this procedure:
1. Clear the area of bystanders, especially small children.
2. Be sure the tractor 3 point hitch is in the Category 1 configuration and the lift
arms are in the non-sway configuration (See tractor manual).
3. Make sure there is enough room and clearance to safely back up to the Tiller.
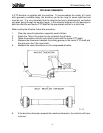
4. Attach the PTO driveline to the Tiller if it was removed for storage (See
Assembly).
5. While backing up, align the lift arm balls with the mounting pins on the Tiller.
ALERT: It may be necessary to add weight to the 3 point hitch to lower
the lift arms.
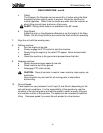
6. Stop tractor, set park brake, remove ignition key and wait for all moving parts to
stop before dismounting.
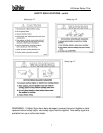
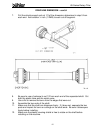
7. If your tractor is not equipped with a Quick Hitch:
a. Align the left lower link arm with the mounting pin.
b. Slide the ball over the pin and install the Linch Pin.
c. Use the screw jack on the right lift arm to align the ball with the pin.
d. Slide the ball over the mounting pin and install the Linch Pin.
e. Level the frame using the screw jack.
f. Remove retainer and pin from the mast.
g. Align top link using the turnbuckle.
h. Insert pin and install Linch Pin
i. Level frame using the turnbuckle.
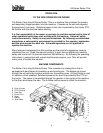
8. If your tractor is equipped with a Quick Hitch:
a. Set the height of the 3 point hitch so the Quick Hitch claws are lower than
the mounting pins.
b. Be sure the 3 point hitch is set in the non-sway position (See tractor
manual for details.)
c. Align the claws under the mounting pins while backing up.
d. When the claws are under the pins, slowly raise the 3 point hitch. Be sure
each of the mounting pins seat in their respective claw.
e. Release the claw retainer locks to secure the mounting pins in the claws.