


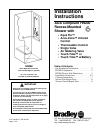


ADA Compliant Recess-Mounted Shower
Installation Instructions HN200
Bradley Corporation • 215-1189 Rev. F; EN 02-342
5
Installation Instructions continued…
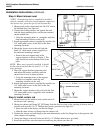
Step 2: Make plumbing connections
NOTE: Hoses need to be connected to 1/2" NPT pipe supply
before the shower is fastened to the wall.
1. Make water supply connections to the stainless steel hoses
(see Figure 2). Equa-Flo™ and Thermostatic= 1/2" NPT
Hot and Cold supplies. Single Valve, Accu-Zone™ Infrared
Control, Air Valve and Touch Time™ = 1/2" tempered
supply.
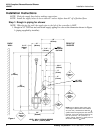
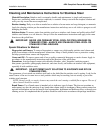
Step 3: Install face plate and grab bar
1. Position the face plate on the wall. Mark the wall and install
twelve wall anchors suitable for use with 1/4"-20 x 3/4"
button head Allen key screws (see Figure 3).
2. Attach the face plate to the wall with twelve 1/4"-20 x 3/4"
button head Allen key screws provided (see Figure 3).
3. Attach the grab bar to the wall.
• Position the “L” of the grab bar to fit the back wall of the
shower stall.
4. Use the flange as a template and mark the six screw hole
locations and install six anchors supplied by installer for
1/4"-20 x 1-1/4" flat head Allen key
screws (see Figure 3).
5. Secure the grab bar to the six wall
anchors using six 1/4”-20 x 1-1/4"
flat head Allen key screws (provided
by installer) (see Figure 3).
Figure 3
NOTE: ALL WALL
ANCHORS SUPPLIED
BY INSTALLER.
GRAB BAR
(S53-184)
1/4"-20 x 3/4"
BUTTON HEAD
ALLEN KEY SCREW
(12) PLACES
(160-143)
1/4"-20 x 1-1/4"
FLAT HEAD ALLEN
KEY SCREW
FACE PLATE
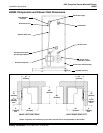
VALVE LEFT - SEAT RIGHT
Figure 2
VALVE LEFT
SEAT RIGHT