


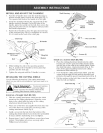
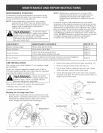
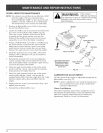

INSTALL AND ADJUST THE D-HANDLE
3.
The squared boHthoHein the handHeis to the right.
2. Insert the shouHder boHtinto the squared hoHein the
handHeand push through, On the Heftside of the
handHe, pHacethe washer on the boHt,then screw the
wing nut onto the boHt.Do not tighten untiHyou make
the handHeadjustment.
3. Rotate the D-handHe to pHacethe grip above the top
of the shaft housing, Mace it a minimum of 6 inches
(15.24 cm) from the end of the shaft grip.
/ Shaft Grip
__ Shaft Hous,rig
Bolt-------_f v
F_g.1
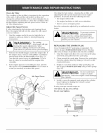
4.
_ DoHandle
1.__ Tighten
While holding the unit in the operating position
(Fig, 2), position the D-handJe to the Jocation that
provides you the best grip.
Tighten the wing nut untiJ the D-handJe is secure.
INSTALLING THE CUTTING SHIELD
Use the following instructions if the cutting attachment
shield on your unit is not installed or if you ever need to re-
install it,
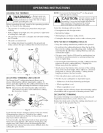
WARNING: Toprevent serious
personal injury,
never operate the trimmer without the
cutting attachment shield in place.
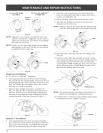
[nstammon a Straight Shaft (BL150)
1. SHidethe cutting attachment shieHdinto the shieHd
mount on the cutting attachment, AHignthe screw
holes in the shield with the holes in the cutting
attachment shieHdmount (Fig. 2).
2. Mace one of the three (3) suppHied hex Hocknuts into
one of the three recessed holies on the top of the
cutting attachment shieHd(Fig 3),
3. [nstaHHa screw into the hoHefrom the bottom of the
cutting attachment shieHd.Screw it into the nut instaHHed
in step 2 untiHit is started (Fig 3). Do not tighten.
4. Repeat steps 2 and 3 untiHaHHthree screws have been
started. Then tighten aHHscrews secureHy with a
PhiHHipshead screwdriver.
Shaft Housing
Cutting
Attachment
\
F_g. 2
Cutting
Attachment
Shield
ShieJd
Mount
_He× Lock Nut
Recessed Homes
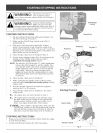
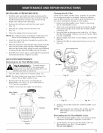
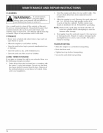
[nstammon a Curved Shaft (BL100)
1. Mace the cutting attachment shieHdonto the shaft
housing, Be sure the guard mounting bracket sHides
into the shoton the edge of the cutting shieHd.Rotate
the shieHdinto pHace,countercHockwise (Fig, 4). The
holies in the guard mounting bracket and cutting
attachment shieHdwill[[ine up.
2. From inside the cutting attachment shieHd,push the
square boHtthrough the hoHeunti[ the threaded end
protrudes through the guard mounting bracket (Fig, 5),
3. Put the washer on the boHt,then screw the wing nut
onto the boHtand tighten.
Sha_ Housing_
Guard
Mounting
Bracket
Cutting Attachment
Shield
F_g. 4
Guard
Mounting \
Bracket
FTV_ • •
Square Bolt
F_g.5
\
Wing Nut