


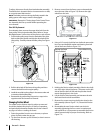

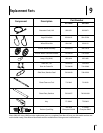

Place the belleville washer (rounded side toward head)
onto the hex screw removed earlier, and insert the
screw into the threaded hole of the hex shaft.
Gradually tighten the hex screw to fully seat the
bearings in each side of the frame and to secure the
hex shaft.
Position the frame cover on the bottom of the frame
and secure with the self-tapping screws. Pivot the snow
thrower down to its normal operating position.
NOTE: If you placed plastic film under the gas cap, be
certain to remove it.
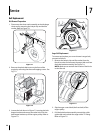
Off-Season Storage
If the snow thrower will not be used for 30 days or longer,
the equipment needs to be stored properly. Follow storage
instructions below to ensure top performance from the
snow thrower for many more years.
NOTE: Refer to the engine manual for more detailed
information on preparing the snow thrower engine for
storage.
Short-Term Storage
It is important to prevent gum deposits from forming
in essential fuel system parts of the engine such as the
carburetor, fuel filter, fuel hose, or tank during short-term
storage (15-30 days). To prevent this, treat the fuel system
using a fuel stabilizer.
Fuel stabilizer (such as STA-BIL™ or ULTRA-FRESH™) is an
acceptable alternative in minimizing the formation of fuel
gum deposits during storage. Add stabilizer to gasoline
in fuel tank or storage container. Always follow mix ratio
found on stabilizer container. Run engine at least 10
minutes after adding stabilizer to allow it to reach the
carburetor.
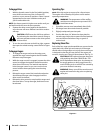
WARNING: Never store snow thrower with fuel
in tank indoors or in poorly ventilated areas,
where fuel fumes may reach an open flame,
spark or pilot light as on a furnace, water heater,
clothes dryer or gas appliance.
Long-Term Storage
To avoid engine problems, the fuel system should be
emptied before storage for 30 days or longer.
Run the engine until the fuel tank is empty and it stops
due to lack of fuel. Do not attempt to pour fuel from
the engine.
Remove the spark plug and pour one (1) ounce of
engine oil through the spark plug hole into the
cylinder. Cover spark plug hole with a rag and crank the
engine several times to distribute the oil. Replace spark
plug.
WARNING: Never use engine or carburetor
cleaning products in the fuel tank or
permanent damage may occur.
15.
16.
17.
1.
2.
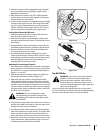
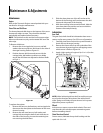
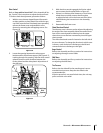
Reposition the friction wheel assembly in the snow
thrower frame. Insert the pin from the shift arm
assembly into the friction wheel assembly and hold
assembly in position. Refer to Figure 7-12.
Slide the hex shaft through the right side of the frame
toward the left side and through the friction wheel
assembly.
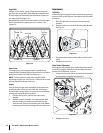
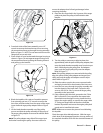
NOTE: If the sprocket fell from the snow thrower chain
while removing the hex shaft, position the hex hub of the
sprocket toward the friction wheel and place the sprocket
in the chain.
After making certain that the chain is on both the large
and the small sprocket, align the hex shaft with the hex
hub of the small sprocket, and slide the shaft through
the sprocket.
Slide the spacer onto the end of the hex shaft.
Align the bearing on the right end of the hex shaft with
the hole in the right side of the frame, then push the
hex shaft to the left into position in the frame.
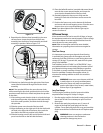
Slide the bearing onto the left end of the hex shaft and
press into the hole on the left side the frame.
9.
10.
11.
12.
13.
14.
Figure 7-12
Figure 7-11
21sectiOn 7 — service