


6
mower to its proper cutting position
and commence cutting.
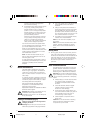
• Proceed down the cutting area as shown
in Fig. G (a), working from position 1
towards position 2 and, on reaching
position 2, turn to the right and proceed
towards position 3. Continue to the end
of the cutting area, turn to the left and
proceed towards position 4.
Continue in the same manner as shown
in Fig G, always working away from the
cable. Do not adopt the method as
shown in Fig. G (b), working towards the
cable, as this is dangerous practice.
Your mower will continue to operate whilst
you are depressing the switch lever. To stop
your mower release the switch lever.
When you have finished using your mower
we recommend that you clean all debris from
it before putting it away. Refer to the ‘Care
and maintenance’ section.
Note: To obtain the best results cut your
lawn or grass area regularly and do not cut
when the grass is wet.
If, when grasscutting, loose grass is seen to
be scattering from beneath your mower, the
grassbox is probably full and should be
emptied.
Blade maintenance
The steel blade is designed to give a fine
finish in long or tough grass. The blade will
continue to cut even when it has become
blunt or burred. There is no need for it to be
razor sharp.
If, however, because of damage or wear the
cutting performance deteriorates, then your
mower may require a new blade, or at least
the existing blade to be sharpened.
We recommend that the steel blade is
sharpened or a new blade fitted at the
beginning of each season.
Replacement blades are available from Black
& Decker service agents.
!
Warning! When fitting a new blade use only
the Black & Decker replacement part
specified for your mower - do not attempt to
fit any other blade.
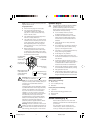
Fitting a new blade (Fig. F)
!
Observe all the relevant warnings before
changing the blade.
Warning! Disconnect your mower from the
electrical supply before changing the blade.
F
• Turn your mower over on its side so that
the underside of the cutter deck is
exposed.
• Using a cloth placed over the blade or
heavy duty gloves to protect your hands,
grip the blade and, using the spanner
provided, loosen and remove the nut (16)
from the motor spindle. Turn the nut in an
anti-clockwise direction to loosen it.
• The blade can now be replaced and the
washer and nut reassembled.
Note: Do not remove the impeller (17) for
any reason.
Note: Some mowers are fitted with a clutch
washer , between the blade nut and the
blade, which must be reassembled at all
times.
Handy hints
• On long grass, above 10cm (4 inches), use two
cuts to get a close finish. We recommend that
the first cut should be taken with the blade set at
maximum height of cut and the second taken
with it set at medium or close. This will prove to
be easier and give a better overall finish to
your lawn.
Care and maintenance
The advice given in this section covers the
general care and maintenance of the main
body of your mower. Advice relating to the
blades is given in “Maintenance of blades”.
!
Warning! Do not use a cable which shows
signs of damage. Fit a new cable completely
- do not make any permanent or temporary
repairs.
• Always keep your mower clean and free
from grass cuttings, especially the
underside of the cutter deck and the
air vents.
• Check all electrical cables at regular
intervals, looking for signs of wear,
abrasion or other damage.
• At the end of each cutting session we
recommend that the build up of grass on
the underside of the cutter cover is
removed using a blunt scraper.
• Clean all plastic components with a
damp cloth.
Caution: Do not use solvents or cleaning
fluids as these may damage the plastic
components of your mower.
GR380/85 UK p01-11 20/3/00, 3:58 pm6