


5
ENGLISH
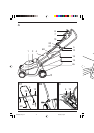
The handle comprises the upper handle (5),
cross bar (20), lower handle (6), switch box
(7), switch lever (8), safety lock-off (9), electric
cable (10), cable clips (11), wing nut and cup
(12) and cable clip (21).
B1
• Insert cross member (20) through cable
clip (21). Assemble left lower leg (6L) and
right lower leg (6R) onto cross member
(20). Clip upper handle (5) over cross
member ends, and fasten into place with
nuts (12).
To assemble the lower handle (6) into the
correct locations on your mower body (1),
proceed as follows:
B2
• Insert the lower handles into the two
holes in your mower body (1) and press
down until secure. Secure in position
using the screws supplied (19).
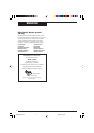
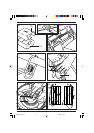
Height of cut adjustment (Fig. C)
Before wheel assembly adjustment ensure
your mower is disconnected from the mains.
Each of the two axle wheels has its own
means of height adjustment which gives
3 cutting height positions.
C
• To select a height of cut, move the
wheels (3) into the slot required using the
spring system (13).
• Fit the other three wheels in the same way.
To ensure an even cut, please make sure
that all four wheels are placed in the same
position.
Grassbox assembly (Fig. D)
Read the safety instructions at the beginning
of this manual before using this accessory.
• The grassbox is a two piece (14 & 15)
plastic construction which needs to be
assembled before attaching it to your
mower.
To assemble the grassbox, proceed as
follows:
D1
• Align both parts together.
D2
• Clip in place.
Fitting the grassbox to your mower:
D3
• The spring loaded grass flap is lifted and
the two arms on the front edge of the
grassbox are located behind the two lugs
rising up from the rear edge of the cutter
deck (Fig. D3).
• The grass flap can now be released to
lock the grassbox into position.
Removing the grassbox from your mower:
The full grassbox may be removed by raising
the grassflap and then either lifting the
grassbox up and through the lower handle(s)
or by freeing the grassbox from its mounting
and then resting it on the lawn, while the
grassflap is gently lowered, leaving both
hands free to gently lift the full grassbox.
How to use your mower (Fig. E & G)
!
Observe all of the relevant warnings when
using your mower.
G
We recommend the directional method of
operation to obtain the maximum cutting
performance from your mower and to reduce
the risk of the trailing extension lead from
entering the cutting path.
• Place the bulk of the supply cable on the
lawn close to the starting point (Fig. G,
position 1).
• Hold the handle assembly with both
hands.
Your switch box incorporates a cable
restraint. To fix the cable to the restraint,
proceed as follows:
• Bring the socket end of the extension
cable from behind and connect it to your
mower plug.
• Form a loop on your extension cable
close to the switch box.
E1
• Push the loop through the slot from the
opposite side of the restraint hook (Fig. E1),
position the loop over the h ook and pull
the cable back through the slot. Your
cable will now be restrained.
• The extension cable should now fall
away from your mower and behind the
operator, ready for use.
!
Warning! Do not attempt to operate your
mower with one hand - you must guide it
with both hands.
E2
• Tilt the handle downwards to slightly
raise the front of your mower and to
reduce the risk of lawn damage whilst
starting, depress the safety lock-off
button (18) on the switchbox (7) and
whilst still depressed pull the switch lever
(8) towards you. Your mower will start
and you can now allow the lock-off
button to be released and lower your
GR380/85 UK p01-11 20/3/00, 3:58 pm5