


8
ENGLISH
(Original instructions)
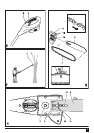
Fitting the saw head (g. C)
The saw head can be tted directly to the handle in
order to achieve standard reach.
• Align the groove on the outside of the coupling
end of the handle (3) with the tongue on the
inside of the coupling end of the saw head (4).
Push the saw head (4) onto the handle (3).
• Slide the collar (14) down and rotate it
clockwise until it is fully tightened.
Warning! Periodically check the connections to
ensure that they are tightened securely.
Extending the saw head (g. D)
The maximum reach can be achieved by tting the
extension tube (10) between the saw head (4) and
the handle (3).
• Align the groove on the outside of the coupling
end of the handle (3) with the tongue on the
inside of the coupling end of the extension tube
(10).
• Push the extension tube (10) onto the handle
(3).
• Slide the collar (15) down and rotate it
clockwise until it is fully tightened.
• Align the groove on the outside of the coupling
end of the extension tube (10) with the tongue
on the inside of the coupling end of the saw
head (4).
• Push the saw head (4) onto the extension tube
(10).
• Slide the collar (14) down and rotate it
clockwise until it is fully tightened.
Warning! Periodically check the connections to
ensure that they are tightened securely.
Removing the saw head (g. C & D)
If the extension tube (10) is tted, the saw head
must be removed rst.
• To remove the saw head (4), rest the handle (3)
on the ground, loosen the collar (14) and take
off the saw head.
Use
Warning! Let the tool work at its own pace. Do
not overload.
Charging the battery (g. A)
The battery needs to be charged before rst use
and whenever it fails to produce sufcient power
on jobs that were easily done before. When charg-
ing the battery for the rst time, or after prolonged
storage, it will only accept an 80% charge.
x
The charger automatically shuts off
if the ambient temperature becomes
too high. As soon as the ambient
temperature has cooled down, the
charger will resume operating.
j
Charge only at ambient temperatures
between 10 °C and 40 °C.
Electrical safety
#
Your charger is double insulated;
therefore no earth wire is required.
Always check that the mains voltage
corresponds to the voltage on the rat-
ing plate. Never attempt to replace the
charger unit with a regular mains plug.
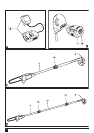
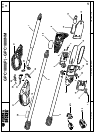
Overview
1. On/off switch
2. Lock-off button
3. Main handle
4. Saw head
5. Sprocket cover
6. Guide bar
7. Chain
8. Chain sheath
9. Lubrication bottle
10. Extension tube
11. Battery
Fig. A
12. Charger
Assembly
Warning! Before assembly, remove the battery
from the tool.
Fitting and removing the battery (g. B)
• To t the battery (11), line it up with the
receptacle on the tool. Slide the battery into the
receptacle and push until the battery snaps into
place.
• To remove the battery, push the release button
(13) while at the same time pulling the battery
out of the receptacle.
Warning! To prevent accidental operation,
ensure that the battery is removed and that
the chain sheath is in place on the saw chain
before performing the following operations.
Failure to do this could result in serious per-
sonal injury.