


11
NOTE:
Make sure that cover is fully positioned, listen for two audible clicks to ensure both
lugsarecorrectlylocated.Powertheapplianceon.Inafewsecondsorlessyou’llhearthe
nylon line being cut automatically to the proper length.
NOTE: Other replacement parts (guards, spool caps, etc.) are available through
Black+Deckerservicecenters.Tofindyourlocalservicelocationcall:1-800-544-6986orvisit
www.blackanddecker.com.
WARNING:TheuseofanyaccessorynotrecommendedbyBlack+Deckerforuse
with this appliance could be hazardous.
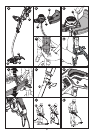
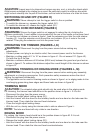
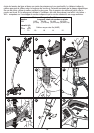
REPLACING THE SPOOL (FIGURES N, O, P, Q)
WARNING: Disconnect the plug from the power source before making any assembly,
adjustments or changing accessories. Such preventive safety measures reduce the risk of
starting the appliance accidentally.
CAUTION: To avoid appliance damage, if the cutting line protrudes beyond the
trimming blade, cut it off so that it just reaches the blade.
• Depressthetabsandremovethespoolcapfromthespoolhousingonthetrimmerhead
figure N.
• Graspemptyspoolwithonehandandspoolcapwithotherhandandpullspoolout.
• ReplacespoolwithBlack+Deckermodel#SF-080.
• Removeanydirtandgrassfromthespoolandspoolcap.
• Iflever(Q1)inbaseofspoolcapbecomesdislodged,replaceincorrectpositionbefore
inserting a new spool.
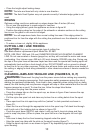
• Unfastentheendofthecuttinglineandguidethelineintotheeyelet(O2).
• PressthespoolGENTLYintothespoolcapandrotateituntilyoufeelitdropintoplace.
Then push to snap into place. (When in place, the spool will turn a few degrees left and
right freely).
• Takecaretokeepthelinefrombecomingtrappedunderthespool.
• Alignthespoolcaptabswiththeslotsonthespoolhousing(figureP).
• SnapthespoolcapbackonasshowninfigurePbydepressinglugsandpressinginto
spool housing.
NOTE:Thelineshouldprotrudeapproximately4-13/16inches(122mm)fromthehousing.
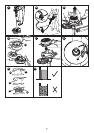
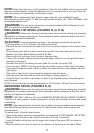
REWINDING SPOOL (FIGURES R, S)
WARNING: Disconnect the plug from the power source before making any assembly,
adjustments or changing accessories. Such preventive safety measures reduce the risk of
starting the appliance accidentally.
NOTE: USEONLY.080inch(2.0mm)DIAMETERROUNDNYLONMONOFILAMENT
LINE. Do not use serrated or heavier gauge line, as they will overload the motor and cause
overheating.
NOTE: Hand wound spools from bulk line are likely to become tangled more frequently
thanBlack+Deckerfactorywoundspools.Forbestresults,factorywoundspoolsare
recommended.
To rewind spool, follow the steps below:
• Removetheemptyspoolfromtheapplianceasdescribedin“REPLACINGTHESPOOL”.
• Makeafoldattheendofthecuttinglineatabout3/4inch(19mm)(R1).
• Insertthefoldedcuttinglineintotheupperholeinsideofthespool(R2)asshownin
figure R3.
• Windthecuttinglineontothespoolinthedirectionofthearrowonthespool.Make