


10
• Closetheheightadjustlockingclamp.
NOTE: The tube and head will only rotate in one direction.
NOTE: The Auto Feed System may not operate correctly if wheeled edge guide is not
used.
EDGING
Optimum cutting results are achieved on edges deeper than 2 inches (50 mm)
• Donotusethisappliancetocreateedgesortrenches.
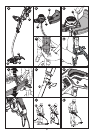
• Usingtheedgingwheel,guidetheapplianceasshowninfigureM.
• Positiontheedgingwheelontheedgeofthesidewalkorabrasivesurfacesothecutting
line is over the grass or dirt area to be edged.
NOTE: You will experience faster than normal cutting line wear if the edging wheel is
positioned too far from the edge with the cutting line positioned over the sidewalk or abrasive
surface.
• Tomakeaclosercut,slightlytilttheappliance.
CUTTING LINE / LINE FEEDING
CAUTION: Only use the appropriate type of cutting line.
UseBlack+DeckerreplacementspoolModelNo.SF-080.
NOTE:USEONLY.080inch(2.0mm)DIAMETERROUNDNYLONMONOFILAMENT
LINE. Do not use serrated or heavier gauge line, as they will overload the motor and cause
overheating.Yourtrimmeruses.080inch(2.0mm)diameter,ROUNDnylonline.Duringuse,
the tips of the nylon lines will become frayed and worn and the special self feeding spool will
automaticallyfeedandtrimafreshlengthofline.DONOTBUMPunitongroundinattempt
to feed line or for any other purposes. Cutting line will wear faster and require more feeding if
the cutting or edging is done along sidewalks or other abrasive surfaces or heavier weeds are
being cut.
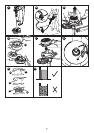
CLEARING JAMS AND TANGLED LINE (FIGURES N, O, P)
WARNING: Disconnect the plug from the power source before making any assembly,
adjustments or changing accessories. Such preventive safety measures reduce the risk of
starting the appliance accidentally. From time to time, especially when cutting thick or stalky
weeds, the line feeding hub may become clogged with sap or other material and the line will
become jammed as a result. To clear the jam, follow the steps listed below.
• Disconnecttheplugfromthepowersource.
• Pressthereleasetabsonthelinespoolcap,asshowninfigureNandremovethecap
by pulling it straight off.
• Pullthenylonlinespooloutandclearanybrokenlineorcuttingdebrisfromthespool
area.
• Placespoolandlineintospoolcapwithline“parked”inslotsprovidedasshownin
figure O1.
• Insertthelineendthroughtheappropriateholeinthespoolcap.Pullslacklinethrough
until it pulls out of the holding slots as shown in figure O2.
• PressthespooldownGENTLYandrotateituntilyoufeelitdropintoplaceandthen
push to snap into place. (When in place, the spool will turn a few degrees left and right
freely).
• Takecaretokeepthelinefrombecomingtrappedunderthespool.
• Alignthespoolcaptabswiththeslotsonthespoolhousing(figureP).
• SnapthespoolcapbackonasshowninfigurePbydepressinglugsandpressinginto
spool housing.