


Part No 500360 9 F052609A
BC2403 Series Brush Cutter Owner’s Manua
l
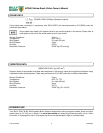
ASSEMBLY INSTRUCTIONS
Your BILLY GOAT
®
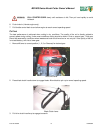
BC Self-Propelled Brush Cutter was shipped in one carton, completely assembled except for the upper
handle assembly and the front guard bar. Mounting hardware for the handle and guard bar is temporarily installed on the
lower handle and the front of the deck assembly.
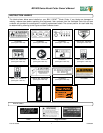
READ all safety instructions before assembling unit.
Electric start units are shipped with a battery. A CB18, C50, SC50 or MCB50 series dry or wet
battery with a 17.2 Ah rating is required when replacing the battery.
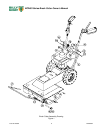
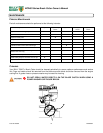
Numbers in parenthesis ( ) refer to item numbers on Figure 1 on the facing page.
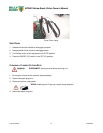
1. Remove unit from carton. Make sure the following items that have been packed with unit:
Upper Handle Assembly, P/N 500256
Guard Bar, P/N 500356
Bar Skids, P/N 500355
Owner’s Manual, P/N 500264
Honda or Briggs and Stratton Engine Manual
Warranty Card, P/N 400972
Ty-Wraps (4 ea)
DISCONNECT spark plug wire before assembling unit.
2. Remove mounting hardware (144, 143, 115, 117, 141) from lower handles (51 and 52).
3. Loosen (but do not remove) four screws (115) securing the lower handles (51 and 52).
4. Attach upper handle (40) to lower handles (51 and 52) with hardware removed in step 2. Tighten finger tight only.
5. Make sure engine pull starter is properly installed in guide (145) and then tighten upper handle fasteners (Honda engine
only).
6. Tighten mounting hardware on handle braces (5 and 6).
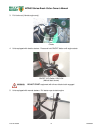
7. Remove mounting hardware (33, 117, 119, and 141) from bar brace (31) and skids (155).
8. Place a wood block under the deck and attach the skids using hardware removed from them. Use the bottom two holes
on the longer end to attach to the front of the deck.
Warning: When attaching the Skids be careful of the blade. Wear thick
gloves and check the position of the blade before putting your hands
into the deck to install the bolts though the Skids.
9. Attach guard bar (31) to Skid bar by installing the side bolts into the top two holes on the skids.
10. For electric start models secure the battery (not included) in the battery plate (164), hook one side of the strap into the
hole then stretch the strap across the top of the battery and hook the opposite side into the opposing hole on the plate.
Make sure the battery will not move then connect terminals.
Items 117, 119 and 141 secure both front skid attachment and sides of front guard bar. Make
sure both are securely attached.
11. Reconnect spark plug wire.