


Part No 360314 Form No F031708A
10
AE Owner’s Manual
ENGAGE TINES: With the aerator in the work area, release the clutch bail and push forward on the tine
engagement lever, lowering the tines into the dirt.
AERATE: Engage the operators clutch bail by pushing it pulling it backwards from the handle, and start aerating.
NOTE: For maximum tine penetration apply downward pressure on the handle.
TURNING: At the end of an aerating run, release the clutch bail and lift up on the tine engagement control to lift the
tines out of the ground. Using the handle lift the front of the unit to pivot it around and line up for the next pass.
TRANSPORT: Be sure to lift the tine engagement lever (tines out of the ground) before transporting away from the
work area.
AERATING TIPS
WATER: For the best performance and maximum tine penetration, the lawn should be thoroughly watered the day
before aeration.
SLOPES: Do not operate the aerator on steep slopes. Use extreme caution when operating on any sloped
surface. For lesser sloped areas operate the unit, traversing up and down at a 45 degree angle to the slope rather
than straight across. Extended operation on steep slopes can cause engine damage.
NOTE: DO NOT release the operators clutch bail when operating on a slope. This will allow the unit to free wheel
and allow the unit to roll down the slope.
NOTE: Honda engines are equipped with a low oil sensor to prevent engine damage. When it senses a low oil
condition (i.e. unit is operating or sitting on a steep slope) the engine shuts down. The low oil condition must be
corrected before the engine can be restarted. See the engine owner’s manual for more information.
TINE PENETRATION: Maximum tine penetration is achieved by applying downward pressure on the handle during
operation.
TURNING: At the end of a pass the tines can be lifted out of the ground to turn by lifting straight up on the
operators handle.
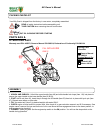
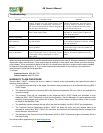
FOLDING HANDLE
This unit is equipped with a folding upper handle for
easier storage. TO FOLD THE HANDLE (See Fig. 3):
1. Slide handle lock loops (item 118) up on both sides.
2. Fold the upper handle (item 48).
Fig 3 Fig 4