


9 GB/IE/CY
Safety instructions
specific to the tool
J Check the condition of the device,
charger
11
, lead
12
and plug
13
before starting to charge the device.
Do not use the tool if any of the parts are dam-
aged. Never open the tool. Repair or replace-
ment must only be carried out by the Service
Office or an electrical expert. Damaged tools,
mains cables or mains plugs pose a danger to
life as a result of electric shock.
J Maintenance and cleaning must only be carried
out when the tool is switched off and the battery
charger is disconnected from the mains power.
J Never under any circumstances charge the
integrated rechargeable battery with the bat-
tery charger if damaged.
J Only use the original battery charger to
charge the integrated battery.
J Before connecting the battery charger to the
mains power, make sure that the mains current
is 230 V
~
50 Hz and is equipped with a 16 A
fuse in accordance with requirements.
Caution! How to avoid injury:
J
Use the following safety gear when
operating the tool: Wear safety gog-
gles, worker safety boots and protec-
tive gloves.
J
Caution! The saw blade
7
runs on after the tool has
been switched off! Avoid any
contact with the rotating saw blade
7
.
J Only remove workpieces when the saw blade
has come to a complete standstill.
J Prevent the saw blade
7
from coming into
contact and / or colliding with stones, metal, or
similar materials. The saw blade
7
may other-
wise be damaged.
J Switch off the device immediately (by releasing
the On / Off switch
4
):
- If you strike any foreign body (e.g. a nail)
while making a cut!
- If the saw blade
7
becomes blocked (e.g.
by wood shavings / sawdust).
J Never have the charger
11
connected to the
device while you are sawing.
J Keep out of the area in which a cut and falling
branch could hit.
Q
Starting operation
Q
Charging the integrated
rechargeable battery
The battery initially requires about 4 - 5 charging
cycles before it achieves its maximum capacity.
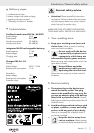
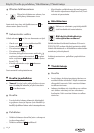
Starting the charging process
j Insert the plug
13
into the charging socket
2
.
j Insert the charger
11
into the mains socket.
The LED on the charger
11
indicates the device’s
battery charge state:
1. R e d : The device requires to be charged or is
being charged.
2. Green: The device is fully charged.
Ending the charging process
j Pull the charger
11
out of the mains socket.
j Pull the plug
13
out of the charging socket
2
.
Only charge the rechargeable battery when it is
empty. This prevents the “memory effect” (loss of
capacity as a result of charging when only partially
discharged).
J Never switch the device on while it is being
charged.
J Do not allow any objects to cover the charger!
The heat generated by the charger while oper-
ating can lead to a build-up of heat!
General safety advice / Starting operation