


English - 3
GB • Printed in England • BA F 016 L69 839 • QX elctric • OSW 02.02
Electrical Safety
Your machine is double insulated for safety and
requires no earth connection. The operating
voltage is 230 V AC, 50 Hz. Only use approved
extension cables. Contact your service agent
for details.
Extension cords/leads should only be used if
they comply with H05VV-F or H05RN-F types.
It is recommended for increased electrical
safety to use a Residual Current Device (RCD)
with a tripping current of not more than 30 mA.
Always check your RCD every time you use it.
For products not sold in GB: WARNING: For
safety, it is essential that the mains plug 7 at-
tached to the machine is fitted to the power
supply cable 31.
The couplings of connection leads must be pro-
tected against splashes and the coupling sock-
ets on the leads must be made of rubber or
coated with rubber.
Fixing means for the connection leads must be
used.
The connection lead must be inspected for
signs of damage at regular intervals and may
only be used if in perfect condition.
If the supply cord is damaged, it must be re-
placed by a Bosch Service Center.
Products sold in GB only: Your mower is fitted
with an approved 13 A (BS 1363/A) electric plug
and is protected by a 13 A fuse (ASTA Ap-
proved to BS 1362).
If the fitted plug is not suitable for your socket
outlets, it should be cut off and an appropriate
plug fitted in its place.
The severed plug must be disposed of to avoid
a possible shock hazard and should never be in-
serted into a 13 A socket elsewhere.
Unfold the top handle 1 and tighten wing-
nut.
Note: Ensure that the cable clips supplied are
used to fix the cable to the handle.
The blades will require adjustment – see “Adjust-
ing Blades”.
Attach cable to cable restraint 6 ensuring that
sufficient cable slack is available. (Euro models
only)
Grassbox/bag
Spring the grassbox cradle 11 into pivot
holes 12.
Attach/remove the grassbox as shown.
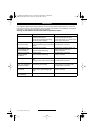
Height of cut adjustment
Your machine has six settings which give the fol-
lowing approximate height of cut:
1 = 10 mm 2 = 14 mm 3 = 19 mm
4 = 27 mm 5 = 35 mm S = Scarifier
Position “S” should only be used with the Scari-
fier Cassette accessory (purchased separately).
To adjust the height of cut:
Tilt the mower to take the weight off the front
rollers.
Push the height of cut knob 10 in and turn to the
desired position.
For the first cutting of the season, a high cutting
adjustment should be selected.
(Windsor models only)
The comb will also require adjustment, See
“Comb Adjustment”.
Comb Adjustment (Windsor models only)
Your mower is fitted with an adjustable comb 13
which can be brought into use on the lower
heights of cut. It is set by loosening the screws 14
and rotating the comb until the tines just touch
the ground. You may need to re-adjust after
changing the height of cut. Take care not to set
the comb too deep, as this could cause dam-
age to either your mower or lawn.
Cutting Long Grass Using Side Wheel Kit (ap-
propriate models only) (Windsor models only)
Note: depending on country your mower may
be fitted with side wheels as standard, in place
of a full width roller.
Your mower is fitted with a full width front roller
which is suitable for normal smooth lawns. For
cutting longer, coarse grass a side wheel kit can
be fitted. To fit this kit proceed as follows:
1. Tilt the mower back and wedge securely.
2. Remove the front roller/comb assembly by
removing screw 14 and slackening nut 15 on
both sides.
3. Fit the side wheel, space tube on to the side
wheels spindle.
For Your Safety
Warning! Switch off, remove plug from mains
before adjusting, cleaning or if cable is cut,
damaged or entangled.
The blades continue to rotate for a few sec-
onds after the machine is switched off.
Caution - do not touch rotating blades.
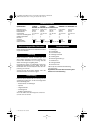
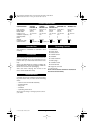
Assembly
A
B
C
C
C
F016 L69 839.book Seite 3 Freitag, 22. Februar 2002 10:04 10
15 • F016 L69 839 • TMS • 05.02.02