


GB - 27
BELT TENSION ADJUSTMENT
Adjust Wheel Drive Lower Belt
Tension
The wheel drive lower belt connects the
mower blade shaft to a variable speed (VS)
pulley on the wheel drive frame.
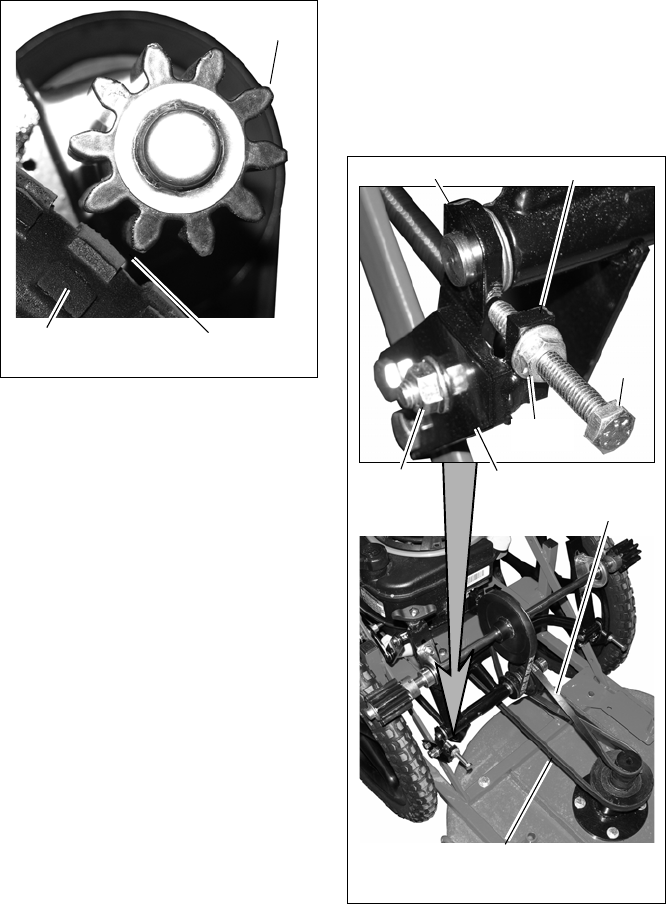
On each side of the mower, the wheel drive
frame pivots from adjustment plates
connected to adjustment brackets. A hex bolt
mounted through each bracket contacts the
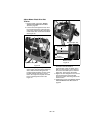
plate to set the frame position. See Figure 28.
1. Remove both the upper and lower
guards. See WHEEL DRIVE
ADJUSTMENTS Drive Belt Guard on
page 23.
NOTE: The adjustment bracket bolt holes are
threaded.
2. Loosen lock nut and bolt attaching each
adjustment plate to the adjustment
bracket. Do not remove hardware.
IMPORTANT: To avoid bending adjustment
bolts, or have them slip off adjustment
brackets, it may be necessary to pull back on
wheel drive assembly as lower belt tension is
adjusted.
NOTE: The adjustment bracket bolt holes are
threaded.
3. Loosen flanged nut on each adjustment
hex bolt away from adjustment bracket.
4. Turn both adjustment bolts in/out evenly
to get 1-1/4" – 1-1/2" (3.175 – 3.810cm)
flex in belt. Use the pressure of one
finger at the center of the belt span to
check for proper flex.
NOTE: Adjust bolt lengths as necessary to
tension belt while maintaining even drive
roller to wheel gap at both wheels.
5. While holding adjustment bolt stationary
with a wrench, tighten flanged nut
against adjustment bracket.
6. Tighten flanged lock nut and bolt
attaching each adjustment plate to the
adjustment bracket.
7. Install both the upper and lower guards.
See WHEEL DRIVE ADJUSTMENTS
Drive Belt Guard on page 23.
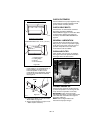
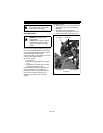
Figure 27
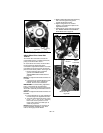
1/8 - 1/4"
(3mm – 6mm)
Gap
Drive
Roller
Tire
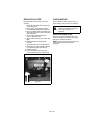
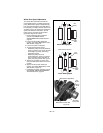
Figure 28
Hex
Bolt
Adjustment
Bracket
Adjustment Plate
Flanged
Nut
Lock Nut
Wheel
Drive
Lower Belt
Adjustment Bracket
Blade Drive Belt