


9
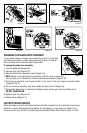
CHANGING THE BLADE DRIVE ASSEMBLY
If your clipper blades no longer cut properly (be sure to try more than
one blade, since blade currently being used may be dull), it could be
that your blade drive assembly needs replacement.
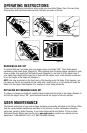
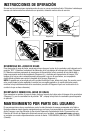
To change the blade drive assembly:
1. Remove blade set (Diagram N).
2. Remove drive cap (Diagram O).
3. Remove blade drive mounting screws (Diagram P).
4. NOTE: Before removing blade drive assembly, note the way it is positioned
(this will help you in reassembly). Remove blade drive assembly (Diagram Q).
5. Drive bearing should be at its lowest position, if not, move it with your finger to lowest position
(Diagrams R & S).
6. Put on new drive assembly, align screw holes and press down (Diagram Q).
7. Reassemble blade drive by replacing mounting screws, turning just until snug (Diagram S).
DO NOT OVERTIGHTEN.
8. Replace drive cap (Diagram O).
9. Replace blade (Diagram T).
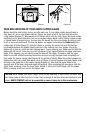
FACTORY REPAIR SERVICE
When the blades of your Andis Clipper become dull after repeated use, it is advisable to send your
blades to an Andis Authorized Service Station for resharpening. If you wish your clipper to be
serviced as well, they should be carefully packed and mailed either Parcel Post Insured, or U.P.S.
Diagram N Diagram O Diagram P
Diagram Q Diagram R Diagram S
Diagram T