


4
4b
4a
3
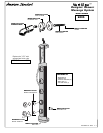
INSTALL the
™
UNIT
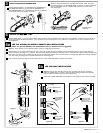
FOR THIN WALL INSTALLATIONS
FOR TILE, CORIAN
®
OR MARBLE/GRANITE WALL INSTALLATIONS
Note: For granite (Marble) wall Installations use of a hammer drill is suggested.
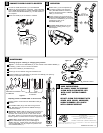
INSTALL DIVERTER WITH SHOWER HEAD
Adjustable Wrench
SHOWER HEAD
REMOVED
3/16" CARBIDE DRILL
Figure 3
. Use 5/16" standard drill bit (not provided) and drill two mounting
holes as detailed above. (Caution: Take care when drilling between the Diverter
and the Valves as water pipes may be located here.)
Insert two TOGGLE ANCHORS (1) and secure unit using the two screws provided.
Ensure ESCUTCHEON (1) is assembled onto DIVERTER (2).
Hold DIVERTER BODY (2) and thread the DIVERTER (2)
with SHOWER HEAD (3) onto NIPPLE (4) until snug against
the finished wall and in position as shown.
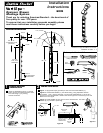
Remove END CAPS (1) from the two ends by sliding forward over the detents as arrows show in illustration. Locate the unit vertically on
the shower wall in the desired position. (Do not mount the unit closer than 6-1/4" (160mm) or further than 11-3/4" (300mm) from
the DIVERTER.
Figure 1
. Hold Vertispa unit in desired location. Refer to roughing-in dimensions.
Mark location of the upper mounting hole. Using a 3/16" carbide drill bit (provided), drill the mounting hole into the shower wall and
install hardware, (See Figure 2). (Caution: Take care when drilling between the Diverter and the valves as water pipes maybe located here).
Mount the unit with screw provided and set the unit vertical using a level. Now mark the lower mounting hole. Remove or swing aside the
unit, drill lower mounting hole and install hardware into mounting hole.
Use mounting screw provided to secure lower section of unit. Slide END CAPS (1) back into position.
(NOTE: If customer desires to use alternate shower head, then pull
back Escutcheon (1) on SHOWER HEAD (2) and turn counter-clockwise
with an adjustable wrench. Replace with customer shower head,
arm and flange.)
1
2
1
1
2
3
1
1
Figure 2
Figure 1
Figure 3
1-1/4" DEEP
DRILL
MOUNTING
HOLE
SQUEEZE ENDS
TOGETHER AND
INSTALL INTO
MOUNTING HOLES.
PUSH RIBBED
ANCHORS IN
MOUNTING
HOLE
MOUNT UNIT
WITH SCREWS
PROVIDED
MOUNT UNIT
WITH SCREWS
PROVIDED
5/16"
4
M968416 REV 1.1