


M968416 REV 1.1
Certified to comply with ANSI A112.18.1M
6035
1
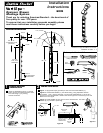
REMOVE EXISTING
SHOWER HEAD
2
INSTALL PIPE NIPPLE
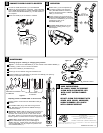
Tools required for installation:
Adjustable Wrench
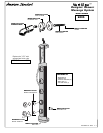
ROUGHING-IN DIMENSIONS
Designer Shower
Massage System
™
Installation
Instructions
Thank you for selecting American-Standard...the benchmark of
fine quality for over 100 years.
25-7/8"
4-3/8"
38-1/8"
3-5/8"
3"
8-5/8"
9-3/4"
UP AND DOWN
ADJUSTMENT
11-3/4 MAX."
6-1/4 MIN."
37-5/16"
MTG. HOLE
REFERENCE
10'
Level
Tape
Measure
5/16"
Drill Bit
Drill
Phillips Screwdriver
Using an adjustable wrench or channel
locks, remove the existing Shower Head,
Arm and Flange (1) by turning
counter-clockwise.
Figure 1.
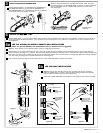
Apply Teflon tape (provided) to the end of the PIPE NIPPLE (1).
Figure 2.
Thread PIPE NIPPLE (1) into elbow fitting, using adjustable wrench
and tighten. Then, using a hacksaw, cut off excess PIPE NIPPLE (1) at the 3rd
groove from the finished wall. Discard the excess pipe and remove any burrs and
debris from the nipple.
Figure 3
. Install O-RING (2) into groove next to finished wall. One extra
O-RING (2) is provided in parts bag.
1
1
EXCESS PIPE
NIPPLE
MAKE CUT AT 3rd
GROOVE FROM
FINISHED WALL
123
Figure 2
Figure 3
Teflon
Tape
FINISHED WALL
FINISHED
WALL
1/2" NPT
Figure 1
Hacksaw
Hacksaw
65" TO 78"
TO FINISHED FLOOR
(OPTIONAL)
Channel Locks
Channel Locks
Adjustable Wrench
To ensure that your installation proceeds smoothly--please
read these instructions carefully before you begin.
2