


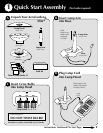

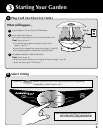
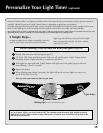


24-Hour
Light
Water LowAdd Nutrients
Replace
Bulbs
Salad
Greens
Flowers
Vegetables Live Plants
Herbs
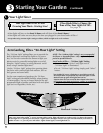
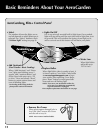
When “Replace Bulbs” light on Control Panel begins blinking after 6
months of use…
• Unplug AeroGarden 6 Elite
+
.
• Remove old Grow Bulbs and carefully discard.*
IMPORTANT: To avoid burning, be sure Grow Bulbs are cool before handling.
• Insert new Grow Bulbs into Lamp Hood.
• Plug in AeroGarden 6 Elite
+
and press and release “Reset” button to
restart grow bulb timer.
Early Grow Bulb Replacement
If you replace Grow Bulbs before “Replace Bulbs” light illuminates, be sure to
restart grow bulb timer as follows:
• Press and hold “Lights” button until light next to your selected plant type
starts blinking – about 5 seconds.
• Release “Lights” button. The plant type selected light will continue to blink
for about 9 seconds. While plant light is still blinking…
• Quickly press and release “Reset” button. “Replace Bulbs” light will blink
once and the plant selected light will stop blinking.
Replace Grow Bulbs – Order bulbs at www.aerogardensupport.com
12
*Check with local recycling authorities for
light bulb recycling availability in your area.
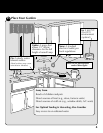
Basic Reminders About Your AeroGarden
(continued)
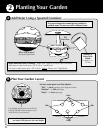
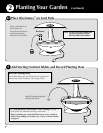
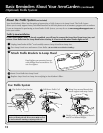
Raise Lamp Hood (Lights)
As plants grow to 1-2” from lights, raise Lamp Arm one notch at a time (each of the three Lamp Arm sections has
three notches). Be sure Lamp Arm is at the lowest setting when you start your AeroGarden 6 Elite
+
.
Unplug AeroGarden 6 Elite
+
and remove Bowl
from Base.
Raise Lamp Arm/Lamp Hood:
• Hold Lamp Arm where it connects to Lamp Hood with
one hand. With other hand, push in Locking Lever.
• Release Locking Lever while pulling up on Lamp Arm.
• Locking Lever will automatically click into next
notch in the Lamp Arm section.
Replace Bowl on Base and plug in
AeroGarden 6 Elite
+
.
Push Locking
Lever in
Push Locking
Lever in
1
2
3
Push Locking
Lever in
Push Locking
Lever in