


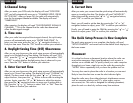
2.Channel Setup
After you enter your FIPS code, the display will read “FIPS CODE
SET” and will automatically move on to “CHANNEL SETUP - PRESS
OK TO SCAN”. After you press OK, the radio will automatically
scan for the strongest channel available. The display will read
“SEARCHING”.
After scanning, the display will read “THE STRONGEST SIGNAL IS
CHANNEL _”. This is the channel that the radio has determined
offers the best signal strength.
6. Current Date
After you enter your current time the quick setup will automatically
move on to setting the date. The display will read “MONTH 01”.
Adjust the month by pressing the “ ” or “ ” navigation buttons,
press “OK” to confirm your selection.
Next, you will need to set the date by pressing the “ ” or “ ”
navigation buttons to adjust, press “OK” to confirm your selection.
Finally, you will need to enter the YEAR by pressing the “ ” or “ ”
buttons to adjust, press “OK” to confirm your selection.
The Quick Setup Process Is Now Complete
The quick setup process is now complete, the display will read
“SETUP COMPLETE” and revert back to the default clock display on
the home screen.
3. Time zone
After your radio has acquired the strongest channel, the quick setup
process will automatically move on to “ENTER TIME ZONE”. To
enter your time zone, press the “ ” or “ ” navigation buttons to
find your time zone. Press the “OK” button to confirm your selection.
4. Daylight Saving Time (DST) Observance
After you set your time zone, the quick setup process will automatically
move on to Daylight Saving Time setting. The display will read “DST
ON”, press the “ ” or “ ” navigation buttons to select either “ON”
or “OFF” to select whether daylight saving time is observed in your
area. Press the “OK” button to confirm your selection.
5. Enter Current Time
After you set your time zone, the quick setup process will automatically
move on to Current Time setting. The display will read “12:00AM” by
default. The hour needs to be set first, press “ ” or “ ” buttons to
adjust the hour, then press the “ ” button to move over to setting the
minutes. Again, press the “ ” or “ ” buttons to adjust the minutes,
then press the “ ” navigation button to move over to setting AM or
PM. Press the “ ” or “ ” buttons to select “AM” or “PM”. Press the
“OK” button to confirm your selection.
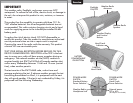
Placement
It is critical to choose a placement location where the radio can
receive the emergency alert signal broadcast, such as near a
window on an outside wall. To quickly check your radio reception
throughout your home, simply turn on the radio by pressing the
“LISTEN” button repeatedly until you hear the speaker turn on.
You may also want to place the radio in a location you are most
likely to hear the alert tone or see the alert indicator lights.
Keep the radio away from other electronic interference sources
such as computer monitors and TVʼs, other radios, motors,
microwaves, etc. This radio is designed for tabletop placement,
place the unit on a level dry surface away from moisture.
QUICK SETUP QUICK SETUP
1110