


12
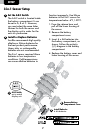
3-in-1 Sensor Installation Guidelines
INSTALLATION HEIGHT Mount the sensor at a minimum height of 5 feet
(1.5 meters) off the ground, in an open area. Higher is better for wind
measurements. The National Weather Service recommends 33 feet high!
MOUNTING OPTIONS The included mounting bracket is designed to screw
directly onto wooden posts or surfaces that are 2”x 4” or larger. The sensor
can also be mounted directly to common 3/4” steel pipe (available at
hardware stores and home centers).
LEVEL INSTALLATION Use a bubble
level (not included) to ensure
level installation for accurate wind
measurement.
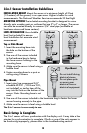
Top or Side Mount
1. Insert the mounting base into
the hole on the bottom of the
sensor.
2. Use one of the screws included
in the hardware bag to fasten
the lower sensor housing to the
mounting base.
3. Make sure the sensor is level using a
bubble level.
4. Fasten mounting base to a post or
railing using 2 screws.
Pipe Mount
1. Insert pipe (we recommend 3/4”
schedule 40 PVC / 25.8 mm O.D.,
not included) or similar item all the
way into the hole on the bottom of the
sensor. Note: Mounting base is not
used.
2. Use one of the screws included in the hardware bag to fasten the lower
sensor housing securely to the pipe.
3. Make sure the sensor is level using a bubble level.
The 3-in-1 sensor is now ready to use.
Basic Setup is Complete
The 3-in-1 sensor will now synchronize with the display unit. It may take a few
minutes for synchronization to complete. If both or one of the units appear to
be functioning improperly, please refer to the troubleshooting section.
Top Mount Side Mount
Pipe Mount
Do not install during
electrical storms.
Do not place pole
or sensor near
electrical lines or
electrical equipment.