


Operation:
1. Press the power (green) switch on the side of the base unit to the “I” position. The green indicator light
will glow, and the unit is now ready for use.
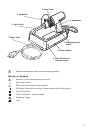
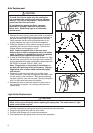
2. Rotate the nose cone to optimize the position of the light guide and hold the light guide no further than
2 mm from the dental material.
NOTE: When a colorless transparent matrix is used to provide anatomical form, the light guide
may be placed directly against the matrix a few seconds after polymerization has begun to avoid
movement of material.
3. Depress the handpiece push-button to activate the bulb. A single audible tone will be heard every
10 seconds. Depressing the handpiece push-button a second time will immediately deactivate
the bulb.
NOTE:The handpiece cooling fan will automatically start at the beginning of, and continue
throughout, the curing time cycle. It will continue running until the unit has cooled sufficiently.
4. When the curing operation is complete, return the handpiece to the holder.
5. To turn the base unit off, depress the power (green) switch on the side of the base unit to the
“0” position.The green indicator light will turn off.
ROUTINE CARE
Plastic
Cleaning/Disinfecting - Turn off the main power (green) switch and unplug the unit before cleaning.
The base unit and handpiece may be cleaned by wiping with a soft cloth moistened slightly with
alcohol or disinfectant. Be careful to prevent entry of liquid into components. Always wipe off any
excess alcohol or disinfectant.
NOTE: Disinfectants with basic glutaraldehyde as an active ingredient are not recommended.
Alcohol should be less than 30% concentration.
Light Guide
1. Carefully handle the light guide to avoid damaging the polished ends.
2. Periodically examine both ends of the light guide. If they are dull or white, check the cure performance
using the Curing Performance Test described in this manual.
3. Do not contaminate the light guide with unpolymerized restorative material to avoid diminished light
transmision.
4. The light guide and eyeshield should be disinfected after each use to prevent transfer of
microorganisms between patients.
Cold Sterilization - Soak the light guide in an alkaline glutaraldehyde type of cold sterilizing solution.
Follow manufacturer’s instructions regarding dilution and recommended exposure times. Use of other
types of solutions (e.g., phenolics) may cause decreased output intensity.
Autoclave - Follow manufacturer’s instructions regarding exposure times. Generally a minimum of 15 minutes
at 121° C (252° F). 15 psi (1000hPa) is recommended. Do not autoclave the light guide at temperatures
above 136° C.
Eyeshield - Dissemble the rubber O-ring from the shield. Clean any debris off the surface with a dull
instrument. Soak shield in an alkaline glutaraldehyde type of cold sterilizing solution for the minimum
amount of time recommended per manufacturer.
CAUTION
Allow the light guide to cool to room temperature before handling to avoid risk of burn.
5