to disassemble the inner mechanism assemblies. Be sure
to use eye protection whenever disassembling and
reassembling your rifle due to the presence of spring-
tension parts. If further disassembly for service or cleaning
is required, take your gun to a Winchester Rifles and
Shotguns Authorized Repair Center or a qualified
gunsmith, or send it to our Arnold, Missouri, service
facility as explained under “Parts, Service, Repair and
Questions” on page 23.
1.
BE CERTAIN THE RIFLE IS COMPLETELY UNLOADED
AND THE SAFETY IS IN THE “ON SAFE” POSITION.
Again, to unload your rifle, remove the magazine and
eject any live cartridge in the chamber by pulling the
operating handle to the rear.
2. Release the bolt to its forward position.
3. Use a 9mm wrench (shown) or pass a small
instrument, such as a screwdriver or punch, through
the sling swivel stud eyelet on the forearm (Figure 12)
to remove the sling swivel. Taking care not to scratch
the forearm, turn the sling swivel in a
counterclockwise direction.
4. Pass a small instrument, such as a screwdriver or
punch, through one of the holes in the forearm
attachment nut (Figure 13), taking care not to
scratch the forearm, turn the forearm attachment
nut in a counterclockwise direction. The forearm
attachment nut is captive and non-removable.
Approximately 10 half-turns will loosen the nut
so you can remove the forearm.
5. Firmly grasp the forearm and slide it forward and off
the rifle.
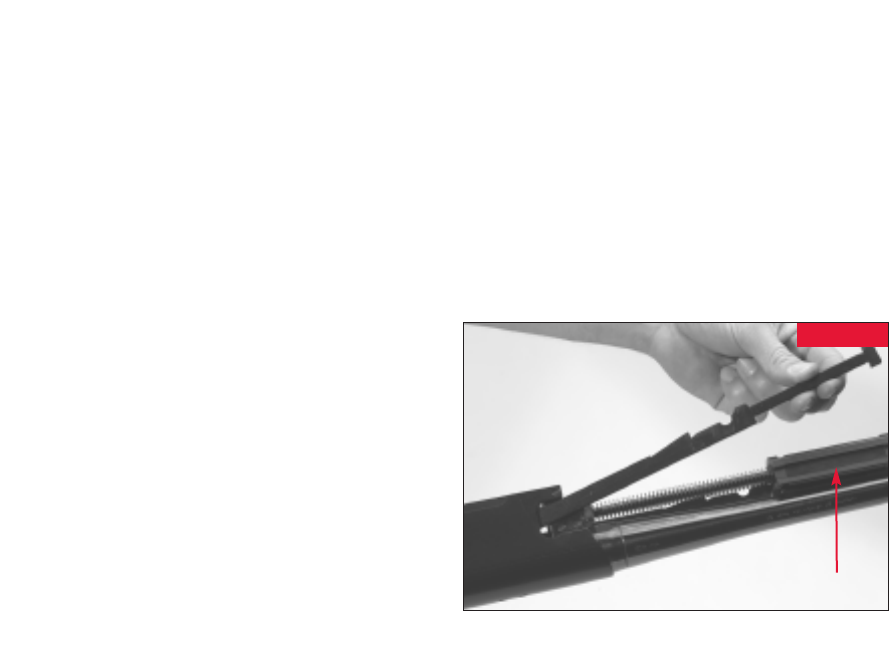
6. Remove the action bars while the bolt is still closed.
To remove the left action bar (the side opposite the
bolt handle), pull the forward end away from its slot
on the inertia block. Lower and pull the action bar
forward and out of the receiver (Figure 14). Remove
the right action bar by first removing the bolt lock
spring from the bolt lock using a flathead screwdriver
(Figure 15).
15
5. Perform any cleaning of the parts and receiver cavity
as necessary. We suggest cleaning the trigger group
with a quality aerosol gun solvent. Allow it to dry and
then very lightly oil the moving parts.
DO NOT DISASSEMBLE THE TRIGGER GROUP
BEYOND THIS POINT.
TRIGGER GROUP REINSTALLATION —
1. Before reinstalling the trigger group, make sure
that the bolt is fully forward and engaged in the
locked position.
2. Visually check the safety on the trigger guard to make
certain it is still in the “on safe” position.
3. Insert the trigger group back into the receiver, lining
up the holes in the trigger group with the holes on
each side of the receiver.
4. Insert the trigger group pins from either side of the
receiver and gently tap them into place using care not
to scratch the receiver.
DISASSEMBLY
NEVER ATTEMPT TO TAKE YOUR RIFLE APART FURTHER
THAN EXPLAINED IN THIS OWNER’S MANUAL.
This rifle is a specialized, finely-fitted mechanism. You
may permanently mar it or lose small parts by attempting
14
FIGURE 12
Remove the sling swivel stud.
FIGURE 13
Remove the forearm
attachment nut.
FIGURE 14
Remove the left action bar from the
inertia block and tilt it out of the bolt.
Inertia Block


