7
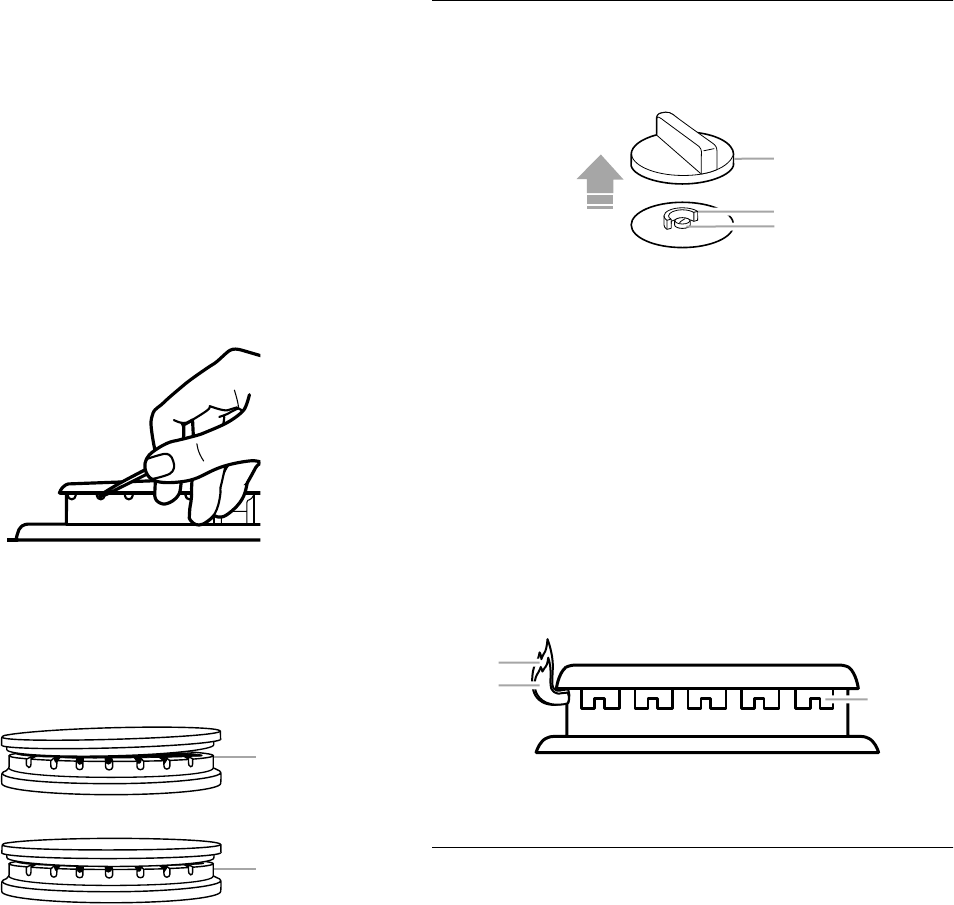
Burner ports: Check burner flames occasionally for proper size
and shape as shown above. A good flame is blue in color, not
yellow. Keep this area free of soil and do not allow spills, food,
cleaning agents or any other material to enter the burner ports.
To Clean:
IMPORTANT: Before cleaning, make sure all controls are off and
the oven and cooktop are cool. Do not use oven cleaners, bleach
or rust removers.
1. Remove the burner cap from the burner base and clean
according to “General Cleaning” section.
2. Clean the gas tube opening with a damp cloth.
3. Clean clogged burner ports with a straight pin as shown. Do
not enlarge or distort the port. Do not use a wooden toothpick.
If the burner needs to be adjusted, contact a trained repair
specialist.
4. Replace the correct size burner cap onto the correct size
burner base, making sure the alignment pins are properly
aligned with the burner cap.
On some models, each size burner cap and burner base has a
corresponding letter “A,” “B,” “C” and “D.” To ensure a proper
fit and that the burner will light, make sure that the burner cap
matches with its corresponding letter on the burner base.
5. Turn on the burner. If the burner does not light, check cap
alignment. If the burner still does not light, do not service the
sealed burner yourself. Contact a trained repair specialist.
Flame Height
Depending on your model, the LO or LOW setting flame height of
each of the surface burners can be adjusted.
To Adjust:
1. Turn surface burner control knob to LITE position (or LIGHT on
some models).
2. When burner has lit, turn control knob to LO position (or LOW
on some models).
3. Remove control knob by pulling straight up.
4. Hold the valve stem with a pair of pliers.
5. Use a small flat-blade screwdriver to turn the adjustment
screw until the flame is steady blue and approximately ¹⁄₄ in.
(6 mm) high.
6. Test the flame by turning the control knob from LO (or LOW on
some models) to HI (or HIGH on some models), checking the
flame at each setting.
Ceramic Glass
Wiping off the cooktop before and after each use will help keep it
free from stains. For more information, see “General Cleaning”
section.
■ Do not store jars or cans above the cooktop. Dropping a
heavy or hard object onto the cooktop could crack it.
■ For foods containing sugar in any form, clean up all spills and
soils as soon as possible. Allow the cooktop to cool down
slightly. Then, while wearing oven mitts, remove the spills
while the surface is still warm. If sugary spills are allowed to
cool down, they can adhere to the cooktop and can cause
pitting and permanent marks.
■ Do not slide cookware or bakeware across the cooktop.
Aluminum or copper bottoms and rough finishes on cookware
or bakeware could leave scratches or marks on the cooktop.
■ Do not allow objects that could melt, such as plastic or
aluminum foil, to touch any part of the entire cooktop.
■ Do not use the cooktop as a cutting board.
1. Incorrect
2. Correct
1
2
1. Control knob
2. Valve stem
3. Adjustment screw
1. High flame
2. Low flame
3. Port
3
2
1
2
1
3
