4. NAVIGATION PLANNING
4-6
4.4 Registering Routes
Often a trip from one place to another
involves several course changes, requiring a
series of route points which you navigate to,
one after another. The sequence of
waypoints leading to the ultimate destination
is called a route. The GP-150 can
automatically advance to the next waypoint
on a route, so you do not have to change the
destination waypoint repeatedly.
The GP-150 can store 30 routes and each
route may contain up to 30 waypoints.
Routes can be registered while in the Plotter
1 or Plotter 2 display mode.
Registering routes
1) Press the WPT/RTE key.
2) Press 6 to select Route Planning. The
route list appears.
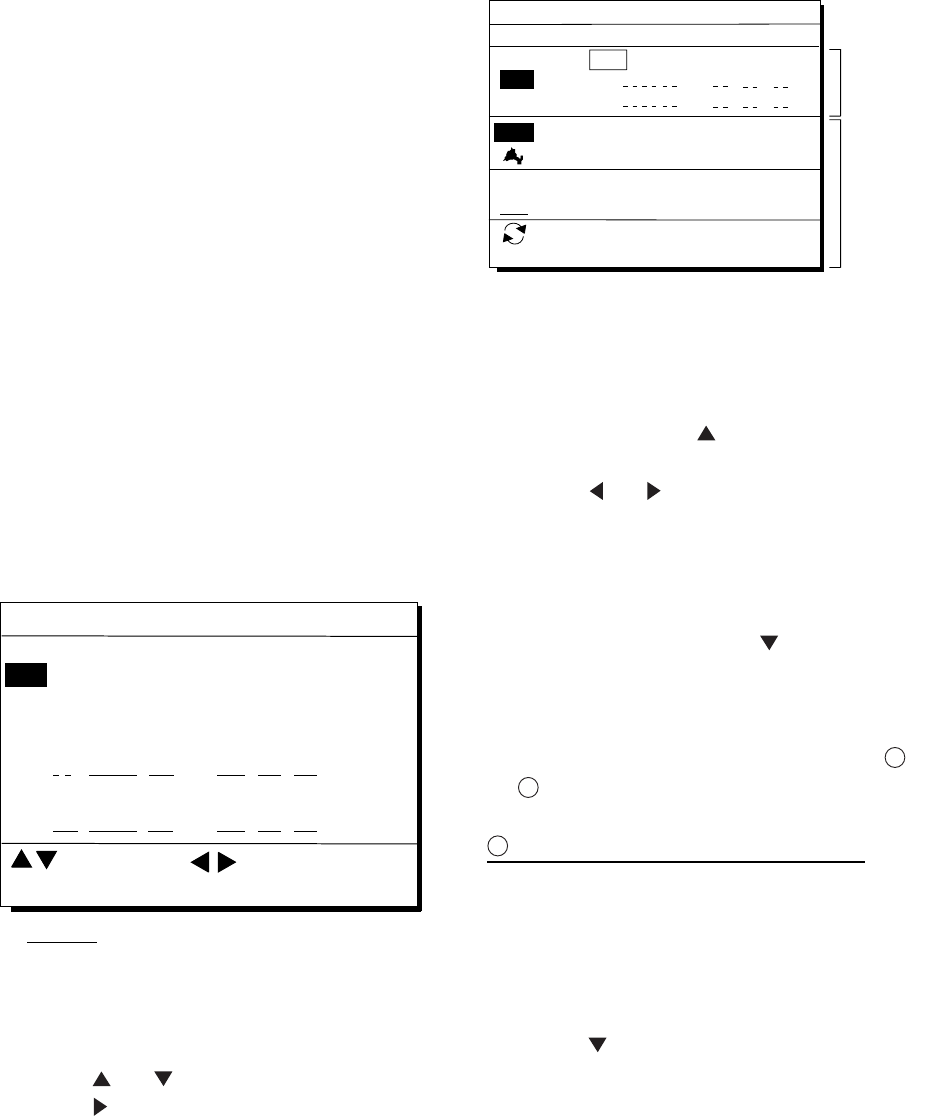
ROUTE LIST
ENT: Enter
MENU: Escape
No. PTS Total Dist. TTG Remarks
01
12D15H28M
1234 . 56 nm
D H M
. nm
30
UseFwd
02
2D08H35M
234 . 56 nm
25
03
*9D*9H*9M
*999. 99 nm
30
04
D H M
. nm
05
34D23H45M
6543 . 21 nm
30
06
: Edit: Route No.
Remarks
Use: In use
Fwd: Traverse waypoints in forward order
Rvs: Traverse waypoints in reverse order
Figure 4-14 Route list
3) Press
or to select route number.
4) Press
.
The route planning/waypoint list window
appear as shown in Figure 4-15. The
waypoint list window lists the position and
data for each registered waypoint. No
position or data appears for empty
waypoints.
34° 12.345’ N 130° 23.456’ E
MARINE POINT
001
ROUTE : 01 (In Use , REVERSE)
ENT: Enter
MENU: Escape
: RTE WPT
36° 12.345’ N 135° 23.456’ E
A POINT
002
AUG 12’ 95 12 : 35U
AUG 13’ 95 13 : 45U
skip Distance TTG
Trial Speed : Auto Man (012.0kt)
01
EN
02
EN
CLEAR: Delete
Use: In use
Fwd: Traverse waypoints in forward order
Rvs: Traverse waypoints in reverse order
Waypoint
list
Route
editing
screen
nm
.
D
M
H
nm
.
D
M
H
Figure 4-15 Route editing screen
5) If required, press
to enter the speed
by which to calculate time-to-go.
6) Press
or to select Auto or Man.
Auto: Current average speed is used to
calculate the time-to-go.
Manual: Entered speed is used to
calculate the time-to-go. Enter
speed and press
.
Route waypoints may be registered two
ways: entering waypoint number directly or
through the route editing screen. Follow
1
or
2
below.
1
Entering waypoint number directly
7) Enter waypoint number, in three digits.
The cursor shifts to the "Skip" window.
The procedure for skipping a waypoint is
shown on page 5-5. For now, go to the
next step.
8) Press
to continue. If the waypoint
entered in step 7 does not exist, you are
informed that the waypoint does not exist
and entry is cancelled.
9) Enter other route waypoints by repeating
steps 7 and 8.
10) Press MENU ESC to finish.


