GB-14
eHT752S / eHT602D
PROCEDURES TO BE PERFORMED AF-
TER EVERY 100 HOURS OF USE
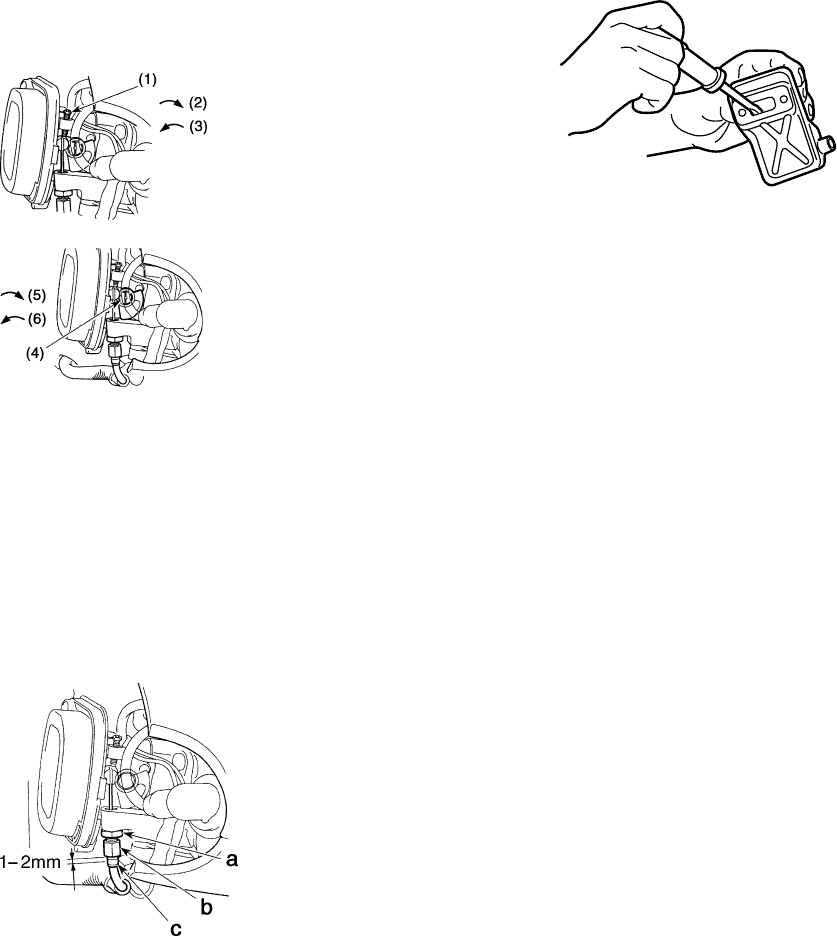
1. Remove the muffler, insert a screwdriver into the vent,
and wipe away any carbon buildup. Wipe away any
carbon buildup on the muffler exhaust vent and cylin-
der exhaust port at the same time.
2. Tighten all screws, bolts, and fittings.
3. Check to see if any oil or grease has worked its way
in between the clutch lining and drum, and if it has,
wipe it away using oil-free, lead-free gasoline.
9. Storage
1. Oil the blade to prevent rust.
2. Empty the fuel tank and put the cap back on.
3. Remove the spark plug, pour a small amount of oil
into the cylinder.
4. Rotate the crankshaft several times using the start-
ing rope in order to distribute the oil. Put the spark
plug back in.
5. Wrap the engine with a plastic sheet.
6. Store the trimmer in a dry place, preferably not in
direct contact with the floor and away from heat
sources.
8. Maintenance
ADJUSTING CARBURETOR
The carburetor has been adjusted at the factory. Should
your unit need readjustment due to the changes in alti-
tude or operating conditions, please let your skillful dealer
make the adjustment. A wrong adjustment may cause
damage to your unit.
THROTTLE WIRE PLAY
Throttle wire play should be 1~2 mm. After completely
returning the throttle lever, take the throttle wire at the
carburetor end in your fingers and give a light tug. If the
play is too great or too small, readjust the position of the
wire retaining nut. Loosen the lock nut and turn the wire
retaining nut clockwise (screw in) to increase the play
and counter-clockwise (unscrew) to reduce it. After ad-
justing, please fasten the wire retaining nut by tighten-
ing the lock nut.
(1) Idle adjusting screw
(2) Up
(3) Down
(4) Fuel adjusting screw
(Opening 1 ± 1/4)
(5) Decrease
(6) Increase
a. lock nut
b. wire retaining nut
c. wire sleeve


