


13
OPERATING INSTRUCTIONS
STARTING AND OPERATION:
1. Making sure the blades are disengaged, ground speed lever in neutral, the thumb latches
locked, and the fuel valve on.
2. Adjust throttle to choke (if needed) turn key to start position, until engine starts.
3. Once the engine is running adjust the throttle.
4. Holding down at least one of the operator presence levers, engage blades and set RPM to
maximum, but not choked. NOTE: Be sure all persons are clear of area before engaging the
blades. To prolong spindle bearing and belt life engage and disengage blades at approxi-
mately 1\2 throttle.
5. Set the ground speed lever to the desired position.
6. Release the thumb latches at the same time.
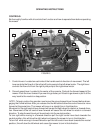
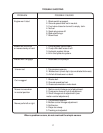
3. Blade engagement switch: Located on the left side of the console. To engage the blades pull
up on the switch. Push down on the switch to disengage the blades.
4.
Choke and throttle control: Located on the right side of the console. Push the throttle control
all the way forward for choke. Use when starting cold engine do not run choke when engine is
warm. Use the throttle to control the engine RPM.
5.
Tracking knob: Located on the left back side of the console. If the mower will not travel in a
straight line on a smooth surface, turn the tracking knob the proper direction until it straight-
ens out.
6. Key switch: Located on the console. The key switch must be turned on, blades disengaged,
and ground speed lever in neutral before starting.
7. Fuel shut off valve: Located on the right side of the engine on the frame. (Not shown.)
8. Pump release valves: Located at the back left corner of the left pump and front right corner of
right pump. Used to release the system so unit may be moved by hand when not running.
(Not shown.)
NOTE: Only rotate about a 1/4 to 1/2 of a turn to release system.
9. Operator presence levers: Located on the handle. One or both levers must be pressed against
the handle for the mower to remain running, when the blades are engaged or the ground
speed lever is not in the neutral position.
10. Thumb Latches: Located on the handle, allows the the control levers to be held in neutral.
11. Hour Meter: Located on the control panel, shows the number of hours unit has been run.