


7
SECTION 5: ATTACHMENTS & ACCESSORIES
SECTION 6: TRACTOR SET-UP
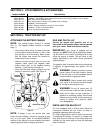
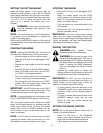
ATTACHING THE BATTERY CABLES
NOTE:
The positive battery terminal is marked
Pos. (+). The negative battery terminal is marked
Neg. (–).
• The positive cable (heavy red wire) is secured
to the positive battery terminal (+) with a hex
bolt and hex nut at the factory. Make certain
that the rubber boot covers the terminal to
help protect it from corrosion.
• Remove the hex bolt and wing nut from the
negative cable. Attach the negative cable
(heavy black wire) to the negative battery
terminal (–) with the bolt and wing nut.
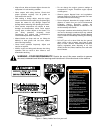
• Place the hold-down strap in position over the
battery to secure it in place. See Figure 2.
Figure 2
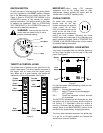
NOTE:
If battery is put into service after date
shown on top of battery, charge for minimum of one
hour at 6-10 amps. Refer to the
MAINTENANCE
section of this manual for more detailed instructions
regarding proper battery charging procedure.
GAS AND OIL FILL-UP
Service the engine with gasoline and oil as
instructed in the separate engine manual packed
with your tractor. Read instructions carefully.
IMPORTANT:
Your tractor is shipped with oil;
however, you MUST check the oil level before operat-
ing. Be careful not to overfill. Overfilling with oil may
cause the engine to smoke. This will result in poor
engine performance and could cause permanent
engine damage.
The gasoline tank is located under the hood and has
a capacity of approximately two gallons. Do not
overfill.
WARNING:
Gasoline produces noxious
fumes. Never fill fuel tank indoors. Always
fill the fuel tank in a well ventilated area to
avoid inhalation of gasoline fumes.
WARNING:
Never smoke while fueling
your tractor or fill the fuel tank while engine
is running or while engine is hot.
WARNING:
Do not fill closer than 1/2
inch from the top of the fuel tank to prevent
spills and to allow for fuel expansion. If
gasoline is accidently spilled, move tractor
away from area of spill. Avoid creating any
source of ignition until gasoline vapors
have disappeared.
INSTALLING THE MULCH KIT
On units equipped with a 46-inch deck, follow the
instructions included with the mulch kit which is
packaged separately within the crate.
On units equipped with a 42-inch deck, the mulch kit
is installed at the factory. To remove it, unfasten the
wing knob found on the top of the cutting deck and
carefully pull the mulch plug out from the discharge
area of the deck.
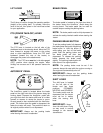
MODEL NUMBER DESCRIPTION
OEM-190-601 FastAttach
™
Twin Bagger Grass Collector (For 42-inch Decks Only)
OEM-190-602 FastAttach
™
Twin Bagger Grass Collector (For 46-inch Decks Only, includes a set of blades)
OEM-190-112 Mulch Kit (For 42-inch Decks Only)
OEM-190-118 Mulch Kit (For 46-inch Decks Only, includes a set of blades)
OEM-190-603 FastAttach
™
Front Bumper Kit
OEM-190-604 TracPac
™
Storage Container (mounts on rear of tractor)
OEM-190-822 FastAttach
™
46-inch Front Dozer Blade
OEM-190-823 42-inch Two-stage Snowthrower
Hold-down Strap
Positive
Terminal
Negative
Terminal
Bolt
Wing
Nut
Rubber
Boot
Battery
Tray