


14
SECTION 7: MAINTAINING YOUR LAWN MOWER
WARNING: Be sure to disconnect and
ground the spark plug wire before
performing any repairs or maintenance.
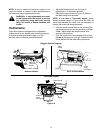
Lubrication
Blade Control
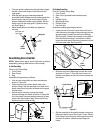
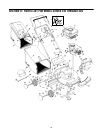
Lubricate the pivot points on the blade control handle
and the brake cable at least once a season with light oil.
See Figure 17. The blade control must operate freely in
both directions.
Rear Discharge Door
The torsion springs and pivot points should be
lubricated periodically with light oil to prevent any rust
or binding. Door must work freely.
Wheels:
The wheels require no lubrication. However, if the
wheels are removed for any reason, lubricate the
surface of the axle bolt and the inner surface of the
wheel with light oil. Engine oil may also be used.
Engine
Follow engine manual for lubrication instructions.
Figure 17
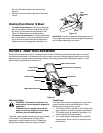
Maintaining the Blade
• Periodically inspect the blade adapter for cracks,
especially if you strike a foreign object. Replace
when necessary.
WARNING: When removing the cutting
blade for sharpening or replacement,
protect hands by using heavy gloves or a
rag to grasp the cutting blade.
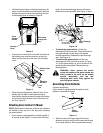
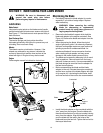
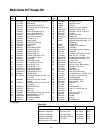
• Remove the bolt and bell support which hold the
blade and adapter to the engine crankshaft. See
Figure 18. Remove the blade and adapter from the
crankshaft.
• When sharpening the blade, follow the original
angle of grind as a guide. It is extremely important
that each cutting edge receive an equal amount of
grinding to prevent an unbalanced blade. An
unbalanced blade will cause excessive vibration
when rotating at high speeds, and may cause
damage to the mower and/or personal injury.
• The blade can be tested by balancing it on a round
shaft screwdriver. Remove metal from the heavy
side until it balances evenly. It is recommended that
the blade always be removed from the adapter for
the best test of balance.
• Before reassembling the blade and the blade
adapter to the unit, lubricate the engine crankshaft
and the inner surface of the blade adapter with light
oil (or engine oil). Lubricating the bolt holes, bolts
and inner surface of the nuts is also recommended.
Figure 18
• Install the blade adapter on the crankshaft with the
“star” away from the engine. Place the blade with
the side marked bottom (or with part number) facing
away from the adapter. Align the blade bell support
over the blade with the tabs in the holes of the
blade and insert the hex bolt. Tighten the hex bolt to
the torque listed here.
L
U
B
E
LUBE
L
U
B
E
LUBE
LUBE
Blade
Adapter
Bell
Support
Hex Bolt
Blade
Crankshaft