13
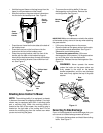
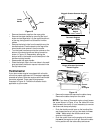
Figure 15
• Remove the starter rope from the rope guide.
• Remove the upper handle by removing the hand
knobs and carriage bolts. Lay the upper handle out
of the way, being careful not to bend or kink the
cables.
• Remove the hairpin clips from the weld pins on the
handle brackets. Press outward on the legs of the
lower handle, and remove it from the mower.
• Turn the lower handle around so the notches on the
bottom of the lower handle are facing forward as
shown in Figure 15. Reassemble, placing the
bottom holes in the handle over the weld pins in the
handle mounting bracket.
• Reassemble the upper handle.
• Place the hairpin clips in the inner holes in the weld
pins and attach the starter rope as instructed in the
Set-Up Instructions.
Throttle Control
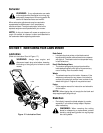
If your lawn mower engine is equipped with a throttle
control that needs adjustment or if it has been replaced,
proceed as follows. Note that engines with fixed throttle
cannot be adjusted. Three types of engines are
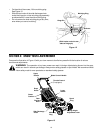
illustrated in Figure 16. Follow the illustration that is
applicable to your mower.
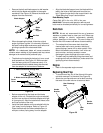
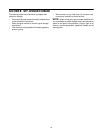
Figure 16
• Remove the screw that secures the cable clamp.
Remove the cable clamp from the cable.
NOTE: If you have a Tecumseh engine, simply loosen
the screw shown in Figure 16 so the cable will move
freely beneath the clamp. It is not necessary to remove
the screw and clamp completely.
• Push the throttle control lever on the handle all the
way forward as far as it will go, then back it off one
“click.” Make certain the throttle control lever
remains in this position.
• Push the control lever on the engine as far toward
the rear of the engine as it will go. Secure the cable
in this position with the cable clamp and screw.
Notch
Lower
Handle
Screw
Cable
Clamp
Control
Lever on
Engine
Briggs & Stratton Quantum Engines
Control
Lever
On Engine
Screw
Cable
Clamp
Tecumseh Engines
Control
Lever
On Engine
Cable
Clamp
Briggs & Stratton Sprint and
Classic Engines
Screw


