


1211
5-3. RE-STARTING A WARM ENGINE
1.
Make sure the on/off switch is in the “I” position.
2. Move the choke lever out as far as it will go.Then, push
the choke lever back in completely. This advances the
throttle so you do not have to hold trigger while starting.
3. Depress the primer bulb 10 times.
4. Pull the starter rope rapidly 4 times. The engine should
start.
5. Depress the safety latch and squeeze and release the
throttle trigger for idle.
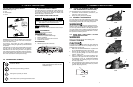
5-4. TO STOP ENGINE
1. Release trigger and allow engine to return to idle
speed.
2. Press STOP switch down to stop engine Figure 5-4A.
NOTE: For emergency stopping, simply activate CHAIN
BRAKE
®
and move STOP switch down.
INERTIA CHAIN BRAKE
®
ACTION :
NOTE: THIS SAW IS EQUIPPED WITH AN INERTIA
CHAIN BRAKE.IF THE SAW KICKS BACK WHILE IN USE,
THE INERTIA OF THE MOVING SAW WILL ACTIVATE
THE BRAKE. A BRAKE BAND AROUND THE CLUTCH
DRUM ACTIVATES AND STOPS THE MOVING CHAIN.
5-5.CHAIN BRAKE
®
OPERATIONAL TEST
Test the CHAIN BRAKE
®
periodically to ensure proper
function.
Perform a CHAIN BRAKE
®
test prior to initial cutting, follow-
ing extensive cutting, and definitely following any CHAIN
BRAKE
®
service.
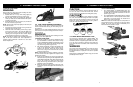
TEST CHAIN BRAKE
®
AS FOLLOWS:
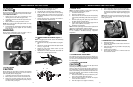
1.
Place saw on a clear, firm, flat surface.
2. Start engine.
3. Grasp the rear handle (A) with your right hand (Figure
5-5A).
4.
With y
our left hand, hold the front handle (B) [not
CHAIN BRAKE
®
lever (C)] firmly (Figure 5-5A).
5. Squeeze the throttle trigger to 1/3 throttle, then imme-
diately activate the CHAIN BRAKE
®
lever (C) (Figure 5-
5A).
WARNING
Activ
ate the CHAIN BRAKE
®
slo
wly and deliberately. Keep
the chain from touching anything; don’t let the saw tip for-
ward.
6. Chain should stop abruptly. When it does, immediately
release the throttle trigger.
WARNING
If chain does not stop, turn engine off and take your unit to
the nearest Authorized Service Center for service.
7. If CHAIN BRAKE
®
functions properly, turn the engine
off and return the CHAIN BRAKE
®
to the DISEN-
GAGED position.
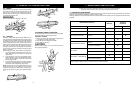
5-6.SAW CHAIN / BAR LUBRICATION
Adequate lubrication of the saw chain is essential at all
times to minimize friction with the guide bar.
Never starve the bar and chain of oil. Running the saw with
too little oil will decrease cutting efficiency, shorten saw
chain life, cause rapid dulling of chain, and cause exces-
sive wear of bar from overheating. Too little oil is evidenced
by smoke, bar discoloration or pitch build-up.
NOTE: Saw chain stretches during use, particularly when it
is new, and it will occasionally be necessary to adjust and
tighten it. New chain will require adjustment after about 5
minutes of operation.
5-7.AUTOMATIC OILER
Your chain saw is equipped with an automatic clutch driven
oiler system. The oiler automatically delivers the proper
amount of oil to the bar and chain.
As the engine speed
increases, so does the oil flow to the bar pad. There is no
flow adjustment. The oil reservoir will run out at approxi-
mately the same time as the fuel supply r
uns out.
5 - OPERATING INSTRUCTIONS
5-5A
A
C
B
5-4A
6 - GENERAL CUTTING INSTRUCTIONS
6-1.FELLING
Felling is the term for cutting down a tree. Small trees up to
6-7 inches (15-18cm) in diameter are usually cut in a single
cut.
Larger trees require notch cuts. Notch cuts determine
the direction the tree will fall.
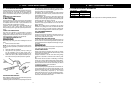
FELLING A TREE:
WARNING
A retreat path (A) should be planned and cleared as nec-
essary before cuts are started. The retreat path should
extend back and diagonally to the rear of the expected line
of fall, as illustrated in Figure 6-1A.
CAUTION
If felling a tree on sloping ground, the chain saw operator
should keep on the uphill side of the terrain, as the tree is
likely to roll or slide downhill after it is felled.
NOTE: Direction of fall (B) is controlled by the notching cut.
Before any cuts are made, consider the location of larger
branches and natural lean of the tree to determine the way
the tree will fall.
WARNING
Do not cut down a tree during high or changing winds or if
there is a danger to property. Consult a tree professional.
Do not cut down a tree if there is a danger of striking utility
wires; notify the utility company before making any cuts.
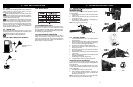
GENERAL GUIDELINES FOR FELLING
TREES:
Normally felling consists of 2 main cutting operations,
notching (C) and making the felling cut (D).
Start making the upper notch cut (C) on the side of the tree
facing the felling direction (E). Be sure you don t make the
lower cut too deep into the trunk.
The notch (C) should be deep enough to create a hinge (F)
of sufficient width and strength. The notch should be wide
enough to direct the fall of the tree for as long as possible.
WARNING
Never walk in front of a tree that has been notched.
Mak
e the felling cut (D) from the other side of the tree and
1.5 - 2.0 inches (3-5 cm) abo
v
e the edge of the notch (C)
(Figure 6-1B).
Ne
ver saw completely through the trunk. Always leave a
hinge
.
The hinge guides the tree
.
If the tr
unk is completely
cut through, control over the felling direction is lost.
Insert a wedge or felling lever in the cut well before the tree
becomes unstab
le and star
ts to mo
v
e. This will prevent the
guidebar from binding in the felling cut if you have mis-
judged the falling direction. Make sure no bystanders have
entered the r
ange of the f
alling tree bef
ore y
ou push it over.
WARNING
Before making the final cut, always recheck the area for
bystanders, animals or obstacles.
FELLING CUT:
1. Use wooden or plastic wedges (G) to prevent binding
the bar or chain (H) in the cut. Wedges also control
f
elling (Figure 6-1C).
2. When diameter of wood being cut is greater than the
bar length, make 2 cuts as shown (Figure 6-1D).
WARNING
As the felling cut gets close to the hinge, the tree should
begin to fall. When tree begins to fall, remove saw from cut,
stop engine, put chain saw down, and leave area along
retreat path (Figure 6-1A).
6-1A
A
B
6-1B
6-1C
G
H
6-1D