


11
¼” allen wrench at the Return-to-Neutral (RTN)
mechanism, if necessary. It is normal to make
these adjustments from time to time.
How to Test/Use the Blade
Clutch/Brake Switch
Before testing the blade clutch/brake operation,
make sure the area is clear and there is nothing
vulnerable to thrown objects from under the
mower. No one should be near the mower deck
or in its line of discharge. The discharge chute
deflector should be in the down position. The
parking brake should now be applied. Move the
engine throttle to ¾ speed setting. When
mowing, the engine speed should always be at
its highest setting. The engine governor will
regulate the engine according to the different
mowing conditions at that setting. Place both
feet firmly on the foot platform and turn on the
blade clutch switch. Run blades for a minute or
so. Try engaging and disengaging the blades a
few times about 10 seconds apart. If the blades
do not start and stop in a few seconds each
time, service the blade brake system or contact
your local Wright dealer. Under mowing load,
the clutch’s life will be the greatest if engaged
and disengaged at the ¾ throttle level.
How to Test the Operator Presence
Control (OPC) Switch
With the parking brakes applied and the blades
ON, try lifting your feet off the foot platform to
test the Operator Presence Control switch
(OPC). The engine should kill and the blades
should stop within a few seconds. If not, service
the OPC system or contact your local Wright
dealer.
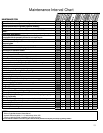
Service and Adjustments
Tire Maintenance and Pressure
Excessively worn tire tread is dangerous on all
hills. Replace drive tires with less than 3/32” of
any tread groove left. Use tires with the tread
pattern recommended by Wright Mfg., Inc. only.
Keep the tire pressure in the drive tires between
18 and 22 psi. Higher pressures will cause the
tires to have less traction, which will force you to
go slower and with less safety and give you a
harder ride. Keep the tire pressure in the front
caster tires between 30 and 40 psi. Higher
pressures will help keep the caster tires on their
rims when impacted from the side but give a
harder ride. They do not have any tread but
should be replaced when excessively worn.
Height-of-Cut
Before adjusting the height-of-cut be sure the
mower engine is off, and all four tires have
proper air pressure. Check for even tire wear.
The height-of-cut can be adjusted the following
way:
• While holding the deck lift lever grip to the left
of the upright, push down (with thumb or other
hand) on the button at the top of the deck lift
lever. With the button pushed down, pull back
slightly and then move the deck lift lever
forward to lower the deck or pull back to raise
the deck. When the deck is at the desired
height, release the button and make sure the
internal stop block is fully locked into place.
There is also a détente pin that can be used to
insure the deck is not lowered to a cutting
height that is lower than the lowest desired
cutting height.
Belt Tension Adjustment
The pump drive belt is self-adjusting, and
requires no adjustment, just replacement. The
blade drive belt is self-adjusting also and
requires no adjustment, just replacement.
How to Move the Mower if the Engine
Won’t Start
Rotate both of the hydro bypass valve levers on
the side of each hydraulic pump about ½ turn
counterclockwise. It is important not to over
tighten these levers. Damage may occur to the
pump if this valve is over tightened.
WARNING
Bleeding Air from the Hydraulic
System
Whenever servicing the hydraulic system, it is of
the utmost importance to keep any dirt or debris
from getting into the system. Clean off all parts
before disassembly and assembly. When any of
the hydraulic parts are disconnected or removed
or when the oil is changed, air must be bled from
the system. If air is entrained in the system, loss
of power, excessive heat, and damage to the
hydraulic pumps may occur. First, make sure
the oil level in the reservoir is correct. The level
should be between 1”-1.5” below the top of the