


10 Operation
MAN0813 (3/17/2010)
OPERATION
The TC rotary tiller is designed for completion of plow-
ing operations and seedbed preparation. It breaks up
clods, levels the soil surface, destroys weeds, and
mixes in fertilizer. Refer to the information in this man-
ual for the specifications, parts, assemblies, and
adjustments.
The operator is responsible for the safe operation of
this rotary tiller. The operator must be properly trained.
Operators should be familiar with the tractor, tiller, and
all safety practices before starting operation. Read the
safety rules and safety decals on page 5 through
page 9.
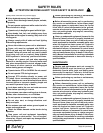
Safety instructions are important! Read all
attachment and power unit manuals; follow all
safety rules and safety decal information. (Replace-
ment manuals and safety decals are available from
your dealer. To locate your nearest dealer, check
the Dealer Locator at www.WoodsEquipment.com,
or in the United States and Canada call 1-800-319-
6637.) Failure to follow instructions or safety rules
can result in serious injury or death.
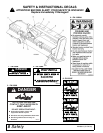
Power unit must be equipped with ROPS or
ROPS cab and seat belt. Keep seat belt securely
fastened. Falling off power unit can result in death
from being run over or crushed. Keep foldable
ROPS system in “locked up” position at all times.
Do not allow bystanders in the area when oper-
ating, attaching, removing, assembling, or servic-
ing equipment.
Never allow children or untrained persons to
operate equipment.
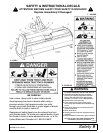
Never go underneath equipment (lowered to the
ground or raised) unless it is properly blocked and
secured. Never place any part of the body under-
neath equipment or between moveable parts even
when the engine has been turned off. Hydraulic
system leak down, hydraulic system failures,
mechanical failures, or movement of control levers
can cause equipment to drop or rotate unexpect-
edly and cause severe injury or death. Follow Oper-
ator's Manual instructions for working underneath
and blocking requirements or have work done by a
qualified dealer.
Before dismounting power unit or performing
any service or maintenance, follow these steps:
disengage power to equipment, lower the 3-point
hitch and all raised components to the ground,
operate valve levers to release any hydraulic pres-
sure, set parking brake, stop engine, remove key,
and unfasten seat belt.
Make sure spring-activated locking pin or collar
slides freely and is seated firmly in tractor PTO
spline groove.
Operate tractor PTO at 540 RPM. Do not exceed.
Make sure attachment is properly secured,
adjusted, and in good operating condition.
ATTACHING ROTARY TILLER TO TRACTOR
1. Move the tractor into position in front of the tiller.
Move back slowly and carefully, not allowing any-
one to be between the tractor and the tiller.
2. Turn off tractor engine.
3. Attach the two lower arms of the 3-point hitch with
the two hitch-pin assemblies.
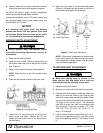
4. Attach the tractor center link to the upper hitch
point of the rotary tiller. Adjust the length of the
center link until the tops of the frame ends are par-
allel to the ground.
5. Adjust the tractor lower 3-point arm anti-sway
devices to prevent tiller from swinging side to side
during transport.
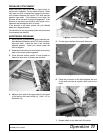
6. Attach the front PTO driveline from the rotary tiller
to the tractor. (Slide the front section of the PTO
driveline into the back section. Slide the PTO shaft
onto the rear PTO output of the tractor).
NOTICE
■ If the PTO driveline is too long, severe driveline
and gearbox damage is possible when hooking up
the PTO driveline from the rotary tiller to the trac-
tor. The front PTO driveline is long enough to fit a
variety of tractors. It is possible that the front PTO
driveline will need to be cut. There will be NO bene-
fit by cutting only one telescoping section. Both
sections of the driveline must be cut. DO NOT
FORCE THE PTO TO FIT.
■ WARRANTY IS VOID IF THE PTO DRIVELINE IS
TOO LONG, resulting in gearbox, PTO, yoke or
cross bearing damage.
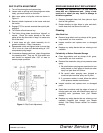
NOTE: The PTO driveline, when attached to the tractor
and gearbox, must not extend so there is less than four
inches of overlap within the PTO driveline.
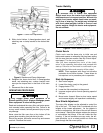
7. Raise jackstand and secure in operating position.
(Rev. 6/7/2011)