


6
3
Setting Up
Your Snow
Thrower
IMPORTANT: Two replacement auger shear pins are
included with this manual (or stowed in the plastic handle
panel). Refer to Augers on page 21 for more information
regarding shear pin replacement.
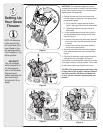
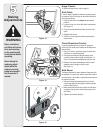
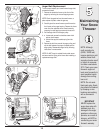
1. Observe the lower area of the snow thrower to be
sure both cables are aligned with roller guides before
pivoting handle upward.
a. Pull up and back on upper handle as shown in
Figure 1. Align upper handle with the lower handle.
b. Tighten hand knobs securing upper handle to
lower handle.
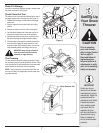
2. If it’s not already attached from the factory, position
the chute assembly (forward-facing) over the chute
base. See Figure 2.
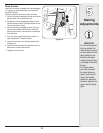
3. a. Insert the round end of the chute control assembly
on the short tube of the chute assembly as shown
in Figure 3.
b. Secure other end of the chute control assembly
onto the chute support bracket.
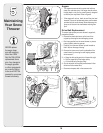
4. Secure the round end of the chute control assembly
to the chute assembly with wing nut provided. See
Figure 4.
5. Check that all cables are properly routed through the
cable guide on top of the engine. See Figure 4.
The extension cord is fastened with a cable tie to the rear
of the auger housing for shipping purposes. Cut the cable
tie and remove it before operating the snow thrower.
CAUTION: Prior to operating your snow thrower, refer
to Auger Control Test on page 11. Read and follow all
instructions carefully, and perform all adjustments
to verify your snow thrower is operating safely and
properly.
Figure 3
Figure 2
NOTE: All references
in this manual to the
left or right side of the
snow thrower is from
the operating position
only. Exceptions, if any,
will be specified.
Figure 1
Figure 4
IMPORTANT
This unit is shipped
with the engine full of
oil. After assembly,
refer to the Tecumseh
Engines manual
packed separately with
your snow thrower
for fuel and oil fill-up
details.