


7
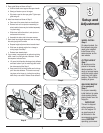
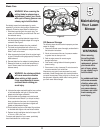
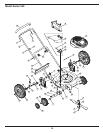
WHEEL INSTALL
Step 6
On select models, the
front wheels may also
need to be installed.
Install these in the
same manner as the
rear wheels.
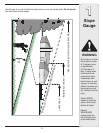
CUTTING HEIGHT
Step 7
All wheels must be
placed in the same
relative position. For
rough or uneven lawns,
move the height adjust-
ment lever to a higher
position. This will stop
scalping of grass.
MULCHING BAFFLE
(if so equipped)
Step 8
For proper assembly,
install bottom lip inside
chute opening before
placing hooks over the
hinge pin.
3
Setup and
Adjustment
Step 7
Step 8
IMPORTANT
This unit is shipped
without gasoline or
oil in the engine. Fill
up gasoline and oil
as instructed in the
accompanying engine
manual BEFORE
operating your mower.
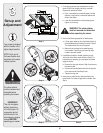
5. Rope guide Setup as follows in Step 5:
a. Hold the blade control against the upper handle.
b. Slowly pull starter rope out of engine.
c. Slip starter rope into the rope guide. Tighten rope
guide wing nut.
6. Install rear wheels as follows in Step 6:
a. Place rear of the mower deck on raised blocks.
b. Remove lock nut from pivot arm assembly (on
select models, these may be included separately
in a plastic bag).
c. Slide wheel, with hollow side in, onto pivot arm
and secure with lock nut.
d. Assemble the other side in the same manner.
7. Each wheel has a height adjustment lever to change
the cutting height of the mower.
a. Depress height adjustment lever towards wheel.
b. Slide lever to desired position for a change in
cutting height. See Step 7.
c. Release lever towards deck.
8. If your mower is equipped with an optional mulching
baffle, install it on the right side of the deck. Follow
the sequence indicated here.
a. Lift up and hold the side-discharge chute deflector
and insert bottom lip of the mulching baffle inside
the chute opening See Step 8.
b. Snap hooks of the mulching baffle over the hinge
pin of the chute deflector. The hooks must snap
into place on the hinge pin, locking the mulching
baffle firmly onto mower. Release chute deflector.
Step 6
Step 5