


11
• Tip the snow thrower forward, allowing it to rest on
the auger housing.
• Remove the frame cover underneath the snow
thrower by removing the six self-tapping screws.
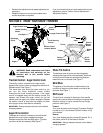
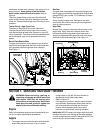
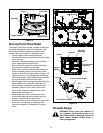
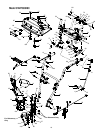
• With the traction control released, there must be
clearance between the friction wheel and the drive
plate in all positions of the shift lever.
• With the traction control engaged, the friction wheel
must contact the drive plate. See Figure 9.
Figure 9
If adjustment is necessary:
• Loosen the jam nut on the traction drive cable.
Adjust the cable as necessary. Refer to Figure 5.
• Retighten the jam nut to secure the cable when
correct adjustment is reached.
• Reassemble the frame cover.
NOTE: If you placed plastic film under the gas cap, be
certain to remove it before operating the snow thrower.
Shift Rod Adjustment
To adjust the shift rod, proceed as follows:
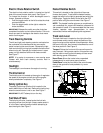
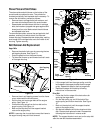
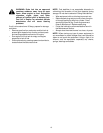
• Remove the hairpin clip and slide the shift rod
connector up, to separate the upper shift rod from
the lower shift rod. See Figure 10.
• Place the shift lever into the sixth (6) position.
• Rotate the shift arm clockwise (from the operator’s
position) as far as it will go.
• Thread the upper shift rod downward until the
elbow on its lower end aligns with the hole found in
the lower shift rod.
• Reconnect the upper shift rod to the lower shift rod
by reinserting the hairpin clip removed earlier and
sliding the shift rod connector back down into place.
IMPORTANT:
Make certain to check for correct
adjustment of the shift rod as instructed under Final
Adjustments in the Assembly Section, before operating
the snow thrower.
Figure 10
SECTION 6: MAINTAINING YOUR SNOW THROWER
WARNING: Before lubricating, repairing,
or inspecting, disengage all clutch levers
and stop engine. Wait until all moving
parts have come to a complete stop.
Disconnect spark plug wire and ground it
against the engine to prevent unintended
starting.
Lubrication
Engine
Refer to the separate engine manual packed with your
unit for all engine lubrication instructions.
IMPORTANT:
When following instructions in separate
engine manual for draining oil, be sure to protect frame
to avoid oil dripping onto transmission parts.
Gear Shaft
Lubricate the gear shaft with 6-n-1 grease at least once
a season or after every 25 hours of operation (available
at automotive stores, or order part number 737-0170).
Refer to Figure 9.
IMPORTANT:
Keep all grease and oil off of the rubber
friction wheel and aluminum drive plate.
Drive and Shifting Mechanism
Lubricate at least once a season or after every 25 hours
of operation. Remove the rear cover, lubricate any
chains, sprockets, gears, bearings, shafts, and shifting
Drive
Cable
Pivot Rod
Drive
Friction Wheel
Rubber
Gear Shaft
Plate
Shift Lever
Hairpin Clip
Flat
Washer
Ferrule
Upper Shift Rod
Hairpin Clip
Lower Shift Rod
Shift Arm
Shift Rod
Connector