10
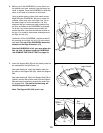
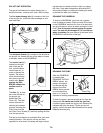
8. Before you fill the DAYBREAK, be sure that it is in
the position you want, and that it can be easily ser-
viced, if needed. Once the DAYBREAK is filled with
water, it will need to be drained to be moved.
Using a garden hose or other clean water source,
begin filling the DAYBREAK. Be sure to check for
wrinkles, which may form in the Spa Liner (9) as
the water begins to cover the bottom. It is very
important that you remove as many wrinkles from
the floor and sides of the DAYBREAK as possible.
To do this, you should smooth any wrinkles out
toward the sides, and then smooth the wrinkles to
the top. It is normal to have some wrinkles around
the Spa Jet Unit (13).
Continue to fill the DAYBREAK, until the jet and fil-
ter openings on the Spa Jet Unit (13) are covered
with water. Do not fill the DAYBREAK above the
bottoms of the Edge Protectors (12).
After the DAYBREAK is full, you must prime the
Spa Jet Unit (13) before using the DAYBREAK
(see PRIMING THE SPA JET UNIT on page 12).
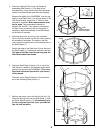
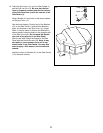
9. Insert the Support Ball (58) into the mesh pocket on
the underside of the Spa Cover (11).
See inset drawing A. Insert the inflation tube into
the hole in the Support Ball (58). Inflate the Support
Ball.
See inset drawing B. When the Support Ball (58) is
inflated, remove the inflation tube from the Support
Ball and insert the ball plug through the mesh into
the Support Ball. The head of the ball plug will
hold the Support Ball in place.
Note: The Support Ball (58) is not a toy.
8
9
13
12
9
BA
11
Mesh Pocket
58
58
Inflation
Tube
Ball
Plug
58


