


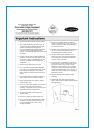
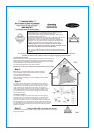
Clip ends must be
aligned as close to
end connectors of lamp
tube when installed. Do NOT
allow to touch tube lamp itself.
Connecting wire
lead
Metal friction clips
Push apart sligtly
to remove
lamp tube end
connectors
Remove & Replace ENTIRE Lamp assembly
including lamp, end connectors & wire lead
NOTE: do NOT allow any metal to contact actual lamp tube
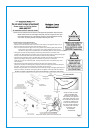
Heatproof
casing pipe
a casing/
electric wire
4 small
bolts
Contact toll free customer service hotline to order approved replacement lamps and parts.
NOTE: do NOT touch the new halogen lamp with your bare fingers.Oils from your
hand could reduce the life of the lamp by causing a heat spot.Recommend using
clean cotton or plastic gloves.A clean paper towel may also work.
Gently re-insert connector
ends of the NEW lamp
assembly into the friction
clips (see #4). Pull apart the
clips slightly and gently push
the connectors into place. Do
not allow the metal clips to
touch the actual lamp tube.
The clips should be about at
the center point of the end
connectors when
re-assembled.
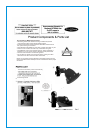
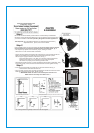
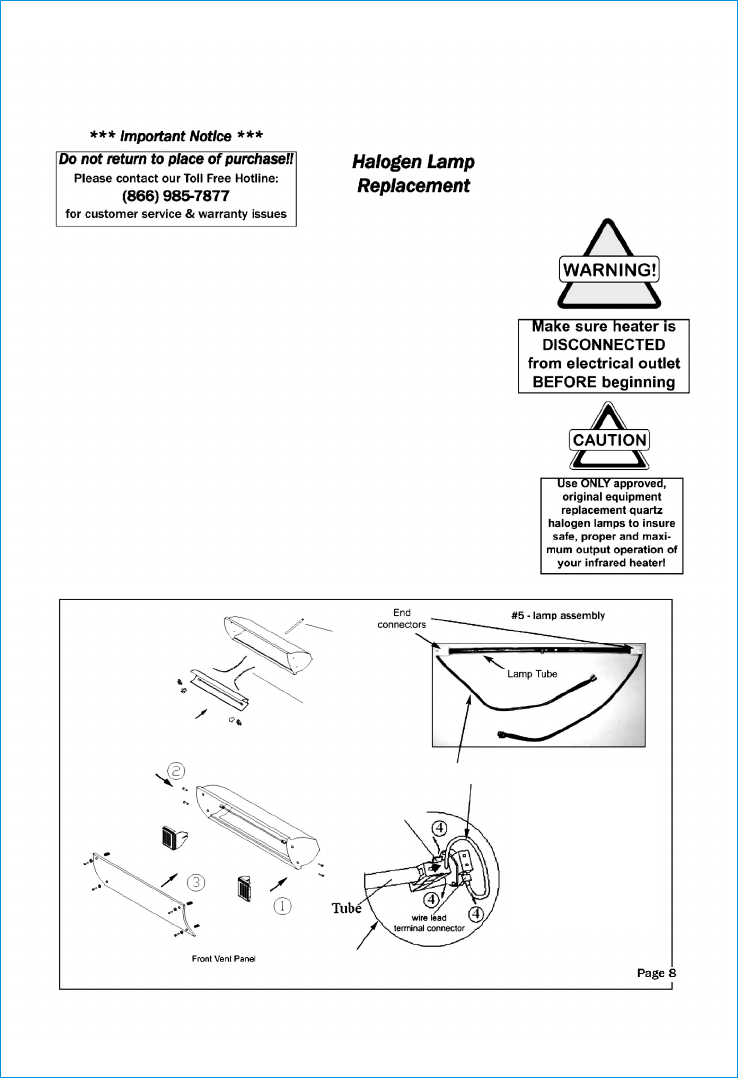
Quartz Halogen Lamp Replacement:
* Be sure unit is unplugged from wall outlet!
* Remove 2 screws from each end of the head unit as shown in the figure as step 1 and 2
Remove 4 bolts from the front glass plate as shown in step 3
* Pull out & remove the left & right, front air vent panels and protective glass plate.(see #3)
- Note position of end clips on vent panel. They must be aligned as close to end
connectors of lamp tube as possible when re-assembled. Pull out and/or pushed into place.
Do NOT over tighten a gap between the glass and steel housing in necessary for heat venting
* Gently pull out entire old lamp assembly from the clips at the terminal connection ends.
(see #4 & #5). Slide and lift the connection ends out from the friction clips by gently pushing apart
the clips. Unscrew wire leads from terminal. Remove entire old lamp assembly.
* Gently re-insert connection ends of the NEW lamp assembly into the friction clips(see #4). Pull
apart the clips slightly and gently push the connectors into place. Do not allow the
metal clips to touch the actual lamp tube. The clips should be about at the center point of the
end connectors.
* Reconnect the wire leads to terminal connectors Re-insert vent panels by gently
pushing the end clips into housing body, align clip ends close to lamp end connectors and push
into place. Insert the 2 screws in each end of the head unit (#1 and #2)
Replace front glass plate ,for best results,insert the 2 bolts for the top of the glass plate first,then
insert the 2 bolts for the bottom of the glass plate Do not tighten until all four bolts are inserted