


10
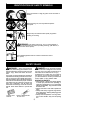
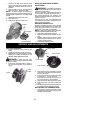
1. Clean the air filter cover and the area
around it to keep dirt from falling into t he
carburetor chamber when the cover is
opened.
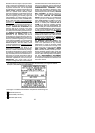
2. Open air filter cover by pushing button
(see illustration). Remove air filter.
NOTE: To avoid creating a fire hazard or
producingharmful evaporativeemissions,do
not cleanfilter ingasoline orother flammable
solvent.
3. Wa sh the filter in soap and water.
4. Allow filter to dry.
5. Replace air filter and close cover .
Air Filter Cover
Air Filter
Button
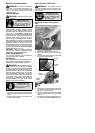
MUFFLER A ND SPARK ARREST-
ING SCREEN
WARNING: The muffler on this prod-
uct contains chemicals known to the State of
California to cause cancer.
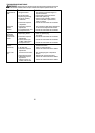
As yourunitis used,carbondeposits buildup
on the muffler and spark arresting screen.
For normal homeowner use, however , the
mufflerandspark a rresting screenwill n otre-
quire any service.
After 50 hours of use, we recommend that
your muffler be serviced or replaced by your
authorized service dealer.
REPLACE SPARK PLUG
Replace the spark plug each year to ensure
the engine starts easier and runs better. Set
spark plug gap at 0.025 inch (0.6 m m). Igni-
tion timing is fixed and nonadjustable.
NOTE: This spark ignition system complies
with the Canadian standard ICES--002.
1. Twist, then pull of f spark plug boot.
2. Remove spark plug from cylinder and dis-
card .
3. Replace with Champion RCJ-6Y spark
plug and tighten securely with a 3/4inch
(19 mm) socket wrench.
4. Reinstall the spark plug boot.
SERVICE AND ADJUSTMENTS
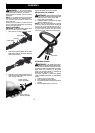
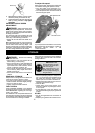
LINE REPLACEMENT
1. Remove spool by firmly pulling on tap
button.
2. Clean entire surface of hub and spool.
3. Replace withapre-wound spool, o r cuttwo
lengths of
12-1/2 feet of 0.080 inch (2 mm)
diameter WEED EA TER brand line.
WARNING: Never use wire, rope,
string,etc.,whichcanbreakoffandbecomea
dangerous missile.
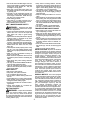
4. Insert ends of the lines about 1/2 inch (1
cm) into the small holes on the inside of
spool.
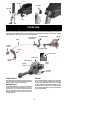
Small
Holes
Spool
Hub
Line in no tch
Line exit hole
Line in notch
Line exit hole
5. Wind the line evenly and t ightly onto the
spool. Windin t hedirectionof thearrows
found on the spool.
6. Push thelines int othe not ches, leaving3
to 5 inches (7 -- 12 cm) unwound.
7. Insert the lines into the the exit holes in
the hub as shown in the illustration.
8. Align t henotches with t heline exitholes.
9. Push spool into hub until it snaps into
place.
10. Pullthelinesextendingoutsideofthehub
to release the lines from the notches.
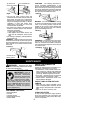
REPLACING THE TRIMMER HEAD
1. Hold the dust cup with a wrench to keep
theshaftfromturningwhileremovingand
installing trimmer head.