8
POWER CORD
ThePOWERCORD iswhereyouattachyour
extension cord to the unit.
TRIGGER SWITCH
TheTRIGGERSWITCHisusedtoturnonthe
unit.Squeezethetriggerswitchtooperatethe
unit. Release to stop.
LINE LIMITER PIN
TheLINE LIMITER P INcuts t hecu ttinglineto
the proper cutting length.
TRIMMER HEAD
The TRIMMER HEAD holds cutting line and
rotates during operation.
OPERATING INSTRUCTIONS
Use only a voltage supply as specified on
your unit.
SELECT AN EXTENSION CORD
Extension Cord Gauge Chart
Length of Cord Gauge
25 Ft. (7.5 m)
50 Ft. (15 m)
100 Ft. (30 m)
18 Gauge
16 Gauge
16 Gauge
Extension cords are available for this unit.
ATTACH THE EXTENSION
CORD TO YOUR TRIMMER
1. Form a loop in your extension cord.
2. Push the loopthrough the slotin thehan-
dle (see illustration).
3. Position the loop over the cord retainer and
pull back to secure.
4. Connect power cord of unit to extension
cord .
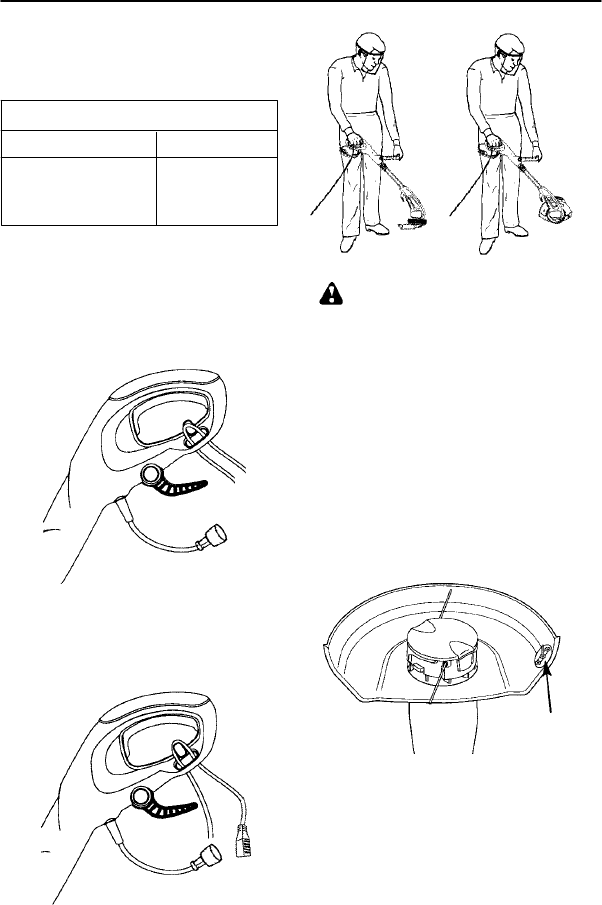
CORRECT OPERATING POSITION
Trimming Edging
WARNING: Alwaysweareyeprotec-
tion. Never lean over the trimmer head.
Rocks ordebr iscanricochetorbethrowninto
eyes and face and cause blindness or other
serious injury.
When operating unit, stand as shown and
check for the following:
S W ear eye protection and heavy clothing.
S Hold trigger handle with right hand and as-
sist handle with left hand.
S Keep unit below waist level.
S Cut only from your right to your left to en-
sure debris is thr own away fr omyou. With-
out bending over, keep linenear and paral-
lel to the ground and not crowded into
material being cut.
AUTOMATIC LINE FEED SYSTEM
When the trimmer is initially started, a small
length of cutting line is fed out.
Line Limiter Pin
Afterapproximately 5seconds,thelinewillbe
cut to the correct length b y the line limiter pin
as the motor reaches full speed. Make sure
the motor is up to full speed before trim-
ming. If the noise of the cutting line being cut
cannot be heard, more line will need to be fed
out.
To feed more line:
S Allowthemotortostopcompletely;then,re-
start the motor and allow it to reach full
speed.


