


7
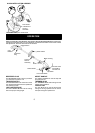
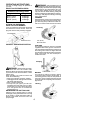
SWEEPING
The fanning action of the rotating line can b e
used fora quick andeasy clean up.Keep the
line parallel to and above the surfaces being
swept and move the tool from side to side.
Sweeping
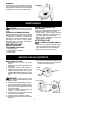
MAINTENANCE
WARNING: Disconnect unitfromthe
power source before performing mainte-
nance.
GENERALRECOMMENDATIONS
Thewarrantyonthisunitdoesnotcoveritems
that have been subjected to operator abuse
or negligence. To receive full value from the
warranty, the operator m ust m aintain unit as
instructed in this manual. Various adjust-
ments will need to be made periodically to
properly maintain your unit.
BEFORE EACH USE
CHECK FOR LOOSE
FA STENERS AND PARTS
S H ousing Screws
S Locking Sleeve Assembly
S Assist Handle
S D ebris Shield
CHECK FOR DAMAGED OR
WORN PARTS
Contact an authorized service dealer for re-
placement of damaged or worn parts.
S Trigger Switch -- Ensure switch functions
properly by pressing andreleasing thetrig-
ger switch. Make sure motor stops.
S D ebris Shield -- Discontinue use of unit if
debris shield is damaged.
AFTER EACH USE
INSPECTAND CLEANUNIT ANDLA-
BELS
S A fter each use, inspect complete unit for
loose or damaged parts. Clean the unitus-
ing a damp cloth with a mild detergent.
S Wipe off unit with a clean dry cloth.
SERVICE AND ADJUSTMENTS
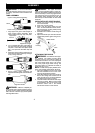
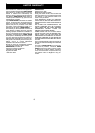
REPLACING THE LINE
1. Disconnect the unit from the power
source.
2. Remove thespoolby firmly pulling onthe
tap button.
3. Clean entire surface of hub and spool.
4. Replace with a pre-wound spool or cut a
length o f 30 feet of 0.065″ (1.65 mm) di-
ameter WEED EATER brand line. Use of
heavier linescould overload anddamage
unit.
WARNING: Never use wire, rope,
string,etc.,whichcanbreakoffandbecomea
dangerous missile.
5. Insertoneendofthelineabout1/2 inch(1
cm) into the small hole inside the spool.
6. Wind the line evenly and tightly onto the
spool. Wind in the direction of the arrow
found on the spool.
7. Push thelineinto t henotch,leaving 3to5
inches (7 -- 12 cm) unwound.
8. Insert the lineinto the exit hole in the hub
as shown in the illustration.
9. Align the notch with the line exit hole.
10. Push the spool into the hub until it snaps
into place.
11. Pull on theline extending outside thehub
toreleaseitfromthenotch;otherwise,the
unit will not function properly.
Small
Hole
Spool
Tap
Button
Hub
Line exit hole
L
ine in Notch