


8
cult to see the material being cut. By using
the unit properly, the oc currence of blade
thrust will be reduced and the operator will
be less likely to lose control.
S
Cutonly grass, weeds, andwoody brush up
to 1/2 inch in diameter with the weed blade.
Do not let the blade contact material it can-
not cut such as stumps, rocks, fences,
metal, etc., orclusters of hard, woodybrush
having a diameter greater than 1/2 inch.
S
Keep the blade sharp. A dull blade is more
likely to snag and thrust.
S
Cut only at full throttle. The blade will have
maximum cutting power and is less likely to
bind or stall.
S
“Feed” the blade deliberately and not too
rapidly. Theblade can thrust away if it isfed
too rapidly.
S
Cut only from your right to your left. Swing-
ing the unit in the s ame direction as the
blade spins increases the cutting action.
S
Use the shoulder strap and keep a firm grip
on the unit with both hands. A properly ad-
justed shoulder strap will support the
weight of the unit, fr eeing your arms and
hands to control and guide the cutting mo-
tion.
S
Keep feet comfortably spr ead apart and
braced for a possible sudden, rapid thrust of
unit. Do not overr each. Keep firm footing and
balance.
S
Keep blade below waist level; it will be eas-
ier to maintain control of unit.
S
Donot raise the engi ne above your waistas
the blade can come dangerously close to
your body.
S
Do not swing unit with such force that you
are in danger of losing your balance.
Bring the engine to cutting speed before en-
tering the material to be cut.
If the blade does not turn when you squeeze
the throttle trigger, make sure tube is fully in-
serted into the engine.
Always release the throttle trigger and allow
engine to return to idle speed when not cut-
ting. The blade should not turn while the en-
gine is running at idle. If the bl adeturns atidle,
do not use your unit. Refer to the Carburetor
adjustment section or contact your Autho-
rized Service Dealer.
S
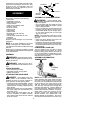
Maintain good firm footing while using t he
unit. Do this by planting feet firmly in a com-
fortable apart position.
S
Cut w hile swinging the upper part of your
body from right to left.
S
Asyou moveforward to the nextarea tocut,
be sure to maintain your balance and foot-
ing.
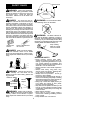
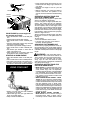
Cut using the 8 o’clock
to 10 o’clock position of
the blade
10 o’clock
8 o’clock
WARNING:
The operator or others
must nottryto clearaway cut material with the
engine running or the blade t urning to avoid
serious injury. Stop engine and blade before
removing materials wrapped around blade or
tube.
REPLACING THE LINE
S
Move the ON/OFF switch to the OFF posi-
tion and ensure trimmer head has fully
stopped.
S
Remove the spool by firmly pulling on the
tap button.
S
Clean entire surface of hub and spool.
S
Replace with a pre-wound spool, or cuttwo
lengths of 12-1/2 feet of 0.080” (2 mm) di-
ameter WeedEater
R
brand line. Never use
wire, rope, string, etc., which can break off
and become a dangerous missile.
S
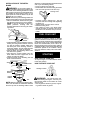
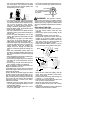
Insert ends of line about 1/2 inch (1 cm) into
the small holes on the inside of the spool.
Small
Holes
Spool
Hub
Line in Notch
Line in Notch
Line exit holes
S
Wind the line evenly and tightly onto the
spool. Wind in t he direction of the arrows
found on the spool.
S
Push the lines into the notches, leaving 3 to
5 inches (7 -- 12 cm) unwound.
S
Insert the lines into the the exit holes in the
hub as shown in the illustration.
S
Align notches with the line exit holes.
S
Push the spool into the hub until it snaps
into place.
S
Pull thelines extending outside ofthe hubto
release the lines from the notches.