


4
HOW TO STOP YOUR UNIT
Push and hold the engine stop switch in the
STOP
or
OFF
position until the unit has fully
stopped.
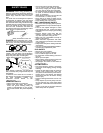
Choke lever
Primer Bulb
Trigger
Muffler
HOW TO START YOUR UNIT
WARNING:
The trimmer head will turn
while starting the engine. A hot muffler can
cause serious burns.
COLD ENGINE STARTING OR
STARTING AFTER REFUELING
S
Set unit on a flat surface.
S
Slowly press the primer bul b 6 times.
S
Move choke lever to FULL CHOKE posi-
tion.
S
Squeeze the throttle trigger fully and hold
through
all remaining steps
.
S
Pull starter rope handle sharply 6 times.
S
Move choke lever to HALF CHOKE posi-
tion.
S
Pull starter rope handle no more than 6
pulls, until engine runs.
S
Allow engine to run 10 seconds, then move
choke lever to OFF CHOKE position.
RESTARTING A WARM ENGINE
S
Move choke lever to
OFF CHOKE
position.
S
Pull starter rope handle until engine runs.
S
If engine does not start in 5 pulls, follow
instructions in STARTING A COLD EN-
GINE.
USING YOUR UNIT
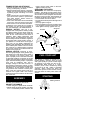
OPERATING POSITION
Eye
Protection
Long Pants
Heavy Shoes
ALWAYS WEAR:
Cut from your right to your left.
ADVANCING THE CUTTING LINE
Advance line bytapping the bottom of the cut-
ting head lightly on the ground while engine is
running at full speed. The metal Line Limiter
blade attached to the shield will cut the line to
the proper length.
REPLACING THE LINE
S
Push and hold the engine stop switch in t he
stop/off position until the unit has fully
stopped.
S
Disconnect the spark plug lead wire.
S
Remove spool by firmly pulling on tap but-
ton.
S
Clean entire surface of hub and spool.
S
Replace w ith a pre-wound spool, or cuttwo
lengths of
12-1/2
feet of .080” (2 mm)diam-
eter Weed Eater
r
brand line. Never use
wire, rope, string, etc., which can break off
and become a dangerous missile.
S
Insert ends of t he line about 1/2 inch (1 cm)
into the small hole on the inside of spool.
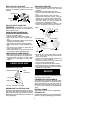
Small
Holes
Spool
Hub
Line in Notch
Line in Notch
Line exit holes
S
Wind the line evenly and tightly onto the
spool. Wind in the direction of the arrows
found on the spool.
S
Push the line into the notches, leaving 3to5
inches (7 -- 12 cm) unwound.
S
Insert the line into the the exit holes in the
hub as shown in the illustration.
S
Align the notches with the line exit hole.
S
Push spool into hubuntil it snaps into place.
S
Pull the line extending outside of the hub to
release it from the notch.
SERVICE
We recommend all service and adjustments
not listed in this manual be performed by an
Authorized Service Dealer.
CARBURETOR ADJUSTMENTS
Your carburetor i s equipped with limiter caps.
Carburetor adjustment is a complicated task.
We recommend that you take your unit to an
Authorized Service D ealer. Damage will oc-
cur i f you turn the needles beyond the limiter
stops.
IGNITION TIMING
The ignition timing is fixed, non-adjustable.
SPARK PLUG
Replace the spark plug yearly using aCham-
pion RCJ--8Y plug. Spark plug gap is 0.025”.