


4
COLD ENGINE STARTING OR
STARTING AFTER REFUELING
S
Set unit on a flat surface.
S
Slowly press the primer bul b 6 times.
S
Move choke lever to FULL CHOKE posi-
tion.
S
Squeeze the throttle trigger fully and hold
through
all remaining steps
.
S
Pull starter rope handle sharply 6 times.
S
Move choke lever to HALF CHOKE posi-
tion.
S
Pull starter rope handle no more than 6
pulls, until engine runs.
S
Allow engine to run 10 seconds, then move
choke lever to OFF CHOKE position.
RESTARTING A WARM ENGINE
S
Move choke lever to OFFCHOKE position.
S
Pull starter rope handle until engine runs.
S
If engine does not start in 5 pulls, follow
instructions in STARTING A COLD EN-
GINE.
USING YOUR UNIT
OPERATING POSITION
Eye Protectio
n
Long Pants
Heavy Shoes
ALWAYS WEAR:
Cut from your right to your left.
ADVANCING THE CUTTING LINE
Advance line bytapping the bottom of the cut-
ting head lightly on the ground while engine is
running at full speed. The metal blade (Line
Limiter) attached to the shield will cut the line
to the p roper length.
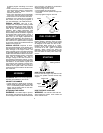
REPLACING THE LINE
S
Push and hold the engine stop switch in t he
stop or off position until the unit has fully
stopped.
S
Disconnect the spark plug lead.
S
Remove spool by firmly pulling on tap but-
ton.
S
Clean entire surface of hub and spool.
S
Replace with a pre-wound spool, or cut a
length of 20 feet of .080” (2 mm) diameter
Weed Eater
r
brand line. Never use wire,
rope, string, etc., which can break off and
become a dangerous missile.
S
Insert one end of the line about 1/2 inch (1
cm) into the small hole on the inside of
spool.
Small
Hole
Spool
Hub
Line exit hole
Line in Notch
S
Wind the line evenly and tightly onto the
spool. Wind in the direction of the arrow
found on the spool.
S
Push the line into the notch, leaving 3 to 5
inches (7 -- 12 cm) unwound.
S
Insert theline intothe theexit hole in t hehub
as shown in the illustration.
S
Align the notch with the line exit hole.
S
Push spool into hubuntil it snaps into place.
S
Pull the line extending outside of the hub to
release it from the notch.
S
Reconnect spark plug lead before starting
unit.
SERVICE
We recommend all service and adjustments
not listed in this manual be performed by an
Authorized Service Dealer.
CARBURETOR ADJUSTMENTS
Your carburetor i s equipped with limiter caps.
Carburetor adjustment is a complicated task.
We recommend that you take your unit to an
Authorized Service D ealer. Damage will oc-
cur i f you turn the needles beyond the limiter
stops.
IGNITION TIMING
The ignition timing is fixed, non-adjustable.
SPARK PLUG
Replace the spark plug yearly using aCham-
pion RCJ--8Y plug. Spark plug gap is .025”.